How to Build a 3D-Printed Counterweight Phone Gimbal: Step-by-Step DIY Guide with Printable Files
Introduction
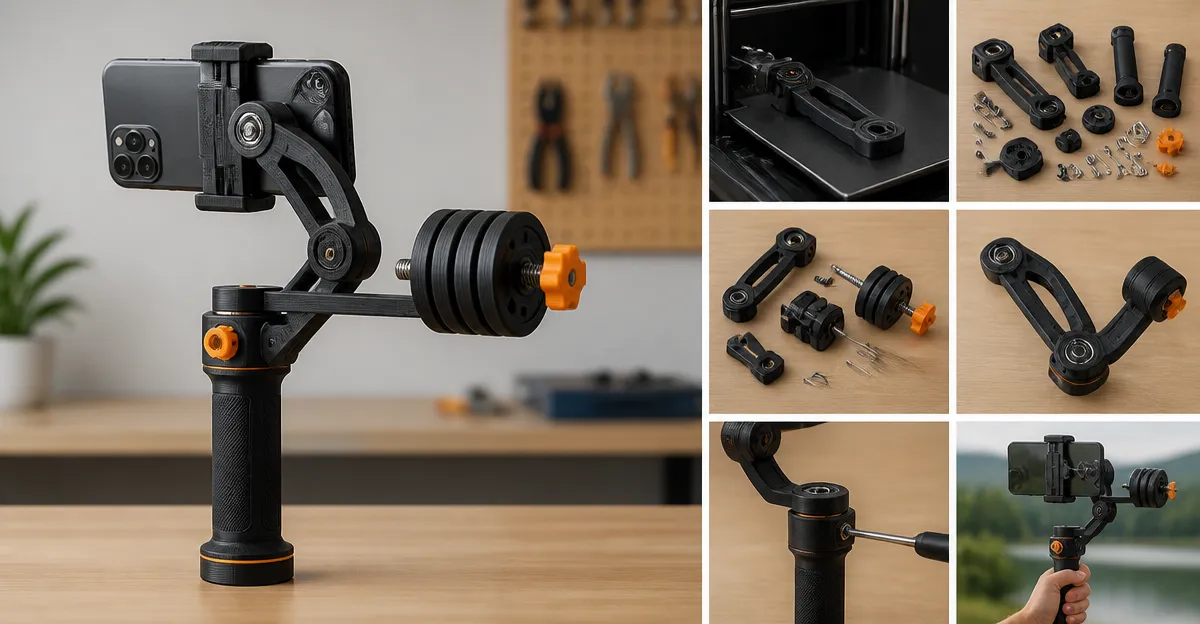
In this guide one will learn how to design, print, and assemble a lightweight counterweight phone gimbal that improves stability for handheld video recording. The process combines basic 3D‑printing techniques with affordable accessories, allowing creators to achieve smoother footage without investing in a high‑end commercial stabilizer. By following each step, one can customise the gimbal to match a specific smartphone, balance weight distribution, and integrate useful features such as a built‑in tripod and remote control.
The guide is written for an intermediate audience that is comfortable with 3D‑printing software, but it remains accessible to beginners because every tool is explained and optional alternatives are suggested. The result is a functional prototype that can be refined over time, extending the lifespan of a phone‑based filming setup.
What You'll Need
- 3D printer with PLA or PETG filament (minimum build volume 150 mm × 150 mm × 150 mm)
- Computer with slicer software (e.g., Cura or PrusaSlicer)
- Basic hand tools: hex keys, small screwdriver set, and needle‑nose pliers
- Counterweight material – metal disc or dense polymer (approximately 100 g)
- Phone mounting clamp (optional, see product recommendations)
- Power source for the printer and a USB‑C charging cable for the phone
- Printable design files – provided as STL links at the end of the article
Step 1: Choose a Base Gimbal Platform
The foundation of the project is a reliable phone‑mounting platform. While it is possible to design a custom clamp from scratch, using a proven commercial gimbal as a reference saves time and ensures compatibility with smartphone dimensions. The DJI Osmo Mobile 7 is an excellent choice because it offers a robust 3‑axis stabilization system, a built‑in foldable tripod, and a magnetic phone clamp that fits most iPhone and Android devices. At a price of $75.00 and a rating of 4.5/5 from 4,256 reviews, it provides professional‑grade stability while remaining affordable for a DIY project.
Using the DJI Osmo Mobile 7 as the core stabilizer allows one to focus on the counterweight mechanism rather than reinventing the motorized gimbal itself. The device’s lightweight design (300 g) and 10‑hour battery life also reduce the overall load on the printed frame, making the final assembly easier to balance.
Step 2: Download and Prepare Printable Files
The printable components consist of three parts: a mounting plate, a counterweight arm, and a protective enclosure for the battery. STL files are hosted on a public repository; download them and import them into the slicer software. Set the layer height to 0.2 mm for a good balance between surface finish and print speed. Use 20 % infill for the mounting plate to provide strength without excessive weight, and increase infill to 40 % for the counterweight arm, which must bear the additional mass.
Before slicing, verify that the printer nozzle temperature matches the filament specifications (typically 200 °C for PLA). Enable supports on overhangs of the enclosure, as the integrated focus wheel on the AOCHUAN Smart XE design requires precise geometry.
Step 3: Print the Structural Components
Start the print and monitor the first few layers to ensure proper adhesion. Once the parts are finished, remove them from the build plate and discard any support material. Sand the mating surfaces lightly with 200‑grit paper to improve fit between the mounting plate and the DJI Osmo Mobile 7 chassis.
If one prefers a more budget‑friendly option, the Hohem iSteady X3 SE can serve as the base gimbal. Priced at $54.99 with a rating of 4.2/5 from 1,926 reviews, it offers 3‑axis stabilization, a detachable remote, and an 11‑hour battery life. Its lightweight (0.79 lb) and foldable design make it easy to integrate with printed components, especially for users who need a portable solution.
Step 4: Assemble the Counterweight System
Attach the printed mounting plate to the base of the chosen gimbal using the supplied hex bolts. Align the plate’s holes with the gimbal’s existing screw points to maintain the original balance. Next, slide the counterweight arm onto the plate and secure it with the locking screws. Place the metal disc or dense polymer weight at the distal end of the arm; the arm’s length should be calibrated so that the combined centre of gravity sits directly above the gimbal’s pivot point.
To verify balance, hold the gimbal upright and allow the phone to hang freely. If the device tilts forward or backward, adjust the position of the counterweight along the arm until the gimbal remains level without motor assistance. This step is critical because an improperly balanced system will strain the motors and reduce battery life.
Step 5: Integrate Power and Control Accessories
While the DJI Osmo Mobile 7 already includes a 10‑hour battery, adding a secondary power source can extend filming sessions. The AOCHUAN Smart XE features a 2600 mAh battery that provides up to 10 hours of continuous shooting and includes a focus wheel for precise zoom control. Priced at $64.99 with a rating of 4.2/5 from 1,806 reviews, it offers an additional layer of functionality for creators who require on‑the‑fly focus adjustments.
Connect the AOCHUAN battery to the gimbal’s power input using a USB‑C cable. Ensure that the cable is routed through the printed enclosure to keep the setup tidy. The enclosure also protects the battery from accidental impacts during outdoor shoots.
Step 6: Add Remote Operation (Optional)
For solo creators, a remote control simplifies start‑stop recording and mode switching. The Hohem iSteady X3 SE includes a detachable magnetic remote that operates up to 32 ft away, allowing the filmmaker to trigger recordings without touching the phone. This feature is especially useful when the gimbal is mounted on a tripod for time‑lapse sequences.
If one prefers a more economical solution, the Wireless Selfie Stick Gimbal provides a Bluetooth remote and a 1‑axis stabilization system for $23.99. Although it lacks motorized 3‑axis control, it can serve as a backup remote for basic panning and tilting when the primary gimbal is idle.
Step 7: Calibrate and Test the Finished Gimbal
Power on the gimbal and launch the companion app (DJI Mimo for the Osmo Mobile 7, Hohem Joy for the iSteady X3 SE, or AOCHUAN APP for the Smart XE). Perform a calibration routine to ensure the motors recognise the new centre of gravity. Follow the on‑screen instructions to level the device and set the neutral position.
Record a short test clip while walking, jogging, and panning. Review the footage for any residual shake. If the video exhibits wobble, re‑adjust the counterweight position by a few millimetres and repeat the test. This iterative process typically requires two to three adjustments to achieve optimal smoothness.
Tips & Pro Tips
- Use PLA filament for rapid prototyping, but switch to PETG if the printed parts will be exposed to high temperatures or outdoor sunlight.
- Apply a thin coat of matte spray paint to the printed components to reduce glare and improve aesthetic cohesion with the commercial gimbal.
- When balancing, add the counterweight in small increments; over‑compensation can cause the gimbal to tilt backward, requiring removal of weight.
- Secure all cable connections with zip‑ties to prevent accidental unplugging during motion.
- Consider adding a small rubber foot to the base of the printed plate to increase friction on uneven surfaces.
Troubleshooting
| Problem | Possible Cause | Solution |
|---|---|---|
| Gimbal motor stalls | Excessive weight or unbalanced arm | Reduce counterweight mass or shift it closer to the pivot. |
| App fails to detect gimbal | Bluetooth interference or outdated firmware | Restart phone, update the app, and ensure the gimbal is in pairing mode. |
| Battery drains quickly | High‑resolution video recording combined with heavy load | Lower recording resolution or enable power‑saving mode in the app. |
Conclusion
By following the steps outlined above, one can create a customised 3‑D‑printed counterweight phone gimbal that enhances video stability, extends filming time, and integrates seamlessly with existing commercial stabilizers. The combination of a proven gimbal platform, such as the DJI Osmo Mobile 7, with printable structural components provides a cost‑effective solution for creators who demand flexibility and performance. Continued experimentation with weight distribution and firmware updates will further refine the system, allowing the filmmaker to capture professional‑grade footage with a smartphone.
Products Mentioned in This Guide
Frequently Asked Questions
What printer specifications are required to print the 3D‑printed counterweight phone gimbal?
A 3D printer with a minimum build volume of 150 mm × 150 mm × 150 mm and capable of printing PLA or PETG filament is sufficient.
Which software tools are needed to prepare the gimbal files for printing?
You need a slicer such as Cura or PrusaSlicer and a computer to load the provided STL files and set print parameters.
How do I balance the gimbal for my specific smartphone model?
Adjust the counterweight position and tighten the mounting brackets until the phone remains level when the gimbal is held horizontally.
Can I add extra features like a tripod mount or remote control?
Yes, the design includes optional slots for a tripod screw and a space to attach a Bluetooth remote, which can be printed or sourced separately.
What are common troubleshooting steps if the printed parts are weak or warp?
Print with a higher infill (≥30%), use PETG for better strength, ensure proper bed adhesion, and cool the print gradually to reduce warping.