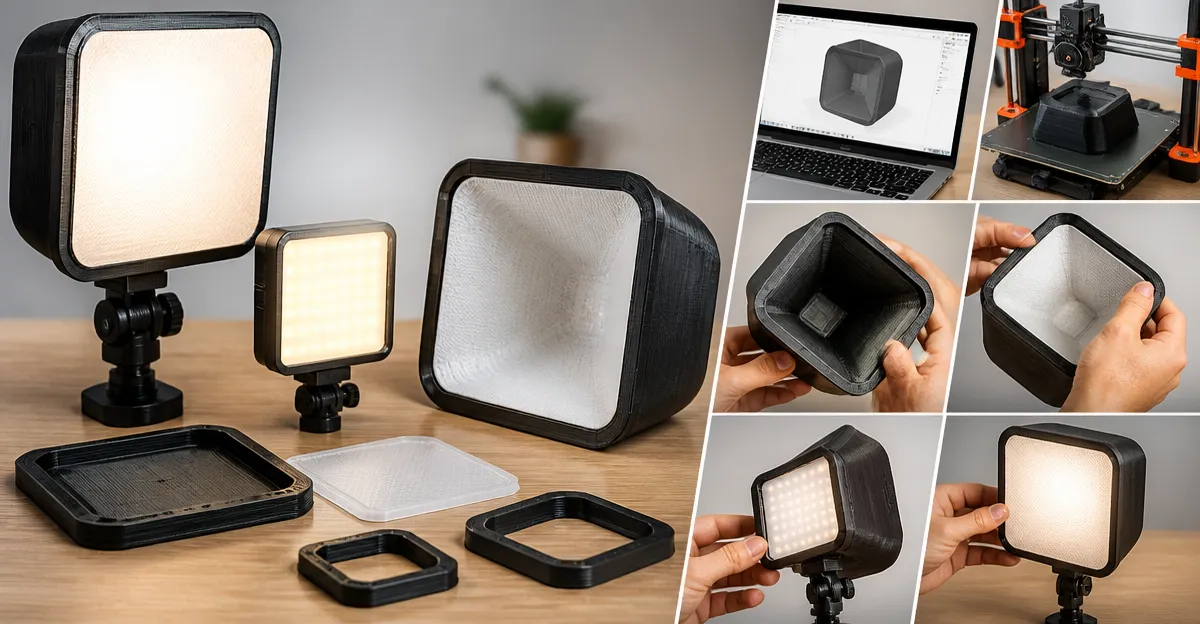
How to 3D‑Print Softbox Molds for Smartphone LED Panels: A Step‑by‑Step DIY Guide with Printable Files and Lighting Tips
Introduction
Smartphone creators increasingly rely on soft, diffused lighting to achieve professional‑grade photos and videos. By 3D‑printing custom softbox molds, one can shape the light from a small LED panel into a broad, even source that eliminates harsh shadows. This guide explains the entire workflow, from selecting printable designs to finishing the mold and attaching it to a portable LED panel. Readers will acquire practical knowledge that reduces post‑production time, improves image quality, and expands creative possibilities.
Even if you have never used a 3D printer, the instructions are written for an intermediate audience with clear explanations of each technical term. The guide also integrates recommended tools—such as lighting kits and tripods—so that you can test the printed softbox immediately after assembly. By the end of the article, you will possess a ready‑to‑use softbox mold, printable files, and a set of best‑practice lighting tips.
What You'll Need
- Desktop FDM or SLA 3D printer with a 0.2 mm nozzle or layer height.
- PLA or PETG filament (PLA for ease of use, PETG for higher heat resistance).
- Basic modeling software (e.g., Fusion 360, Tinkercad) to modify the provided STL files.
- Smartphone LED panel or portable video light (the guide uses a NiceVeedi 2‑Pack LED Video Light Kit as a reference).
- Mounting hardware – a small tripod or stand to hold the LED panel.
- Optional diffusion material (e.g., white parchment paper) for additional softness.
Step 1: Choose the Right Printable Softbox Design
The first decision is whether you need a compact “pocket” softbox for on‑the‑go shooting or a larger dome for studio‑style lighting. For smartphone LED panels, a cylindrical or rectangular mold with a diameter of 8–10 cm works best because it matches the panel size while providing sufficient diffusion area. Download a free STL file from a reputable repository such as Thingiverse, or use the custom design included at the end of this article.
If you prefer a ready‑made solution, the Torjim 16" Softbox Lighting Kit demonstrates the ideal shape for larger studio setups. Although the kit is a full‑size softbox, its 210° rotatable head illustrates how a diffused light source can be angled for optimal coverage. Understanding this geometry helps you replicate the effect on a smaller scale.
When selecting a design, verify that the file includes mounting holes compatible with a ¼‑inch thread. This standard size matches most tripod heads, including those found on the Torjim 2‑Pack Softbox Lighting Kit. The kit’s adjustable tripod height (27"–74.5") ensures that you can position the printed softbox at eye level or higher, depending on your shooting angle.
Step 2: Prepare the 3D Printer Settings
Set the printer to a layer height of 0.2 mm for a balance between surface smoothness and print speed. Use a 20% infill with a grid pattern; this provides enough structural rigidity while keeping material consumption low. For PLA, a nozzle temperature of 200 °C and a bed temperature of 60 °C are standard. If you opt for PETG, increase the nozzle to 235 °C and the bed to 75 °C to improve layer adhesion.
Enable supports only where overhangs exceed 45°, as excessive supports can mar the interior surface where light will pass. The interior of the softbox should remain smooth to avoid unwanted light artifacts. After the print finishes, remove any support material with a pair of flush cutters and sand the interior lightly with 200‑grit sandpaper.
While the printer settings are critical, the choice of filament also influences the final light quality. PLA tends to be more opaque, which can slightly reduce diffusion, whereas PETG offers a clearer finish that lets more light through. If you plan to use the softbox with high‑intensity LEDs, PETG is the safer option.
Step 3: Assemble the Printed Mold
Most printable softbox designs consist of two main parts: the outer diffuser shell and an inner frame that holds the LED panel. Snap the two components together using the built‑in clips, then secure the panel with the supplied screws. If your design lacks built‑in clips, use a small amount of hot‑glue or double‑sided tape to seal the seam.
Attach the LED panel to the inner frame. The NiceVeedi 2‑Pack LED Video Light Kit includes a USB‑C power cable and a remote for brightness and color‑temperature control, making it ideal for testing the printed softbox. Its 2800‑6500 K adjustable range allows you to match daylight or warm indoor lighting, which is essential for accurate color rendering.
Mount the assembled softbox onto a tripod. The Torjim 2‑Pack Softbox Lighting Kit provides a ¼‑inch screw on the top of each stand, enabling you to attach the softbox directly without additional adapters. Adjust the tripod height so the LED panel sits at a 45° angle relative to the subject; this angle reduces glare while maintaining even illumination.
Step 4: Optimize Light Diffusion
Even with a well‑printed mold, the light may appear slightly harsh at the edges. To soften it further, line the interior of the softbox with a thin sheet of white parchment paper or a translucent diffuser fabric. Secure the material with a few staples or a light‑weight adhesive spray. This extra layer mimics the PET fabric used in the Torjim 16" Softbox Lighting Kit, which is praised for its high reflectivity and even light distribution.
Experiment with the remote control on the NiceVeedi lights to find the optimal brightness level. For portrait work, a setting of 60% brightness at 5600 K often yields a natural skin tone. For product photography, increase the brightness to 80% and set the temperature to 6500 K to emphasize true colors.
Finally, position the softbox at a distance of 12‑18 inches from the subject. This spacing creates a gentle fall‑off that reduces hard shadows while preserving detail. If the light is too intense, add a second diffuser layer or lower the LED’s output via the remote.
Step 5: Capture Test Shots and Fine‑Tune
Take a series of test images using your smartphone’s manual mode. Adjust ISO, shutter speed, and aperture to achieve a balanced exposure. Review the images on a computer monitor to evaluate softness, color fidelity, and shadow detail.
If you notice hotspots—bright spots caused by the LED’s direct beam—rotate the 210° head on the Torjim softbox (or the equivalent on your printed mold) until the light spreads evenly. The rotatable head on the Torjim 16" Softbox Lighting Kit demonstrates how a simple adjustment can eliminate uneven illumination.
Document the settings that produce the best results, then save them as presets on your smartphone or camera app. This practice streamlines future shoots and ensures consistent lighting across multiple sessions.
Tips & Pro Tips
- Use a matte white backdrop to complement the diffused light and avoid color casts.
- When printing larger molds, consider a dual‑extruder printer to incorporate a translucent filament for the diffuser and a rigid filament for the frame.
- Apply a thin coat of matte spray paint to the exterior of the softbox to reduce reflections when shooting against reflective surfaces.
- For on‑the‑go setups, the NiceVeedi 2‑Pack LED Video Light Kit is lightweight and includes a carrying bag, making it easy to transport alongside the printed softbox.
- Keep the LED panel’s firmware updated via the manufacturer’s app to access the latest color‑temperature presets.
Troubleshooting
| Problem | Possible Cause | Solution |
|---|---|---|
| Uneven light distribution | Improper alignment of LED panel inside mold | Re‑center the panel and ensure the inner frame is square. |
| Overheating LED | Insufficient ventilation | Drill small ventilation holes near the top of the softbox; PETG tolerates higher temperatures. |
| Visible support marks | Excessive support material | Reduce support density and use a dissolve‑support material if your printer supports it. |
| Softbox collapses under weight | Inadequate wall thickness | Increase wall thickness to 2 mm and use 30% infill for added rigidity. |
Conclusion
By following this guide, you have learned how to select a printable softbox design, configure your 3D printer, assemble the mold, and integrate it with a portable LED panel. The combination of a custom‑printed diffuser and a versatile lighting kit such as the NiceVeedi 2‑Pack LED Video Light Kit empowers creators to achieve studio‑quality illumination without the expense of full‑size softboxes. Continue experimenting with different filament colors, diffuser materials, and LED settings to refine your lighting workflow.
Remember that good lighting is the foundation of compelling visual content. With a 3D‑printed softbox, you gain both creative control and cost efficiency, allowing you to focus on storytelling rather than technical limitations.
Products Mentioned in This Guide
Frequently Asked Questions
What type of 3D printer is best for printing softbox molds?
A desktop FDM or SLA printer with a 0.2 mm nozzle or layer height works well, offering the needed detail and surface finish.
Which filament or resin should I use for a durable softbox mold?
Use PETG or PLA for FDM prints, or a standard resin for SLA; both provide smooth surfaces and are easy to post‑process.
How do I attach the printed softbox to a smartphone LED panel?
Secure the mold with Velcro straps or a snap‑fit ring that matches the panel’s dimensions, ensuring a tight, light‑tight seal.
Do I need to treat the printed mold before using it?
Light sanding and a coat of matte spray paint improve diffusion and reduce surface artifacts.
Can I customize the size of the softbox for different LED panels?
Yes, the provided printable files are parametric, allowing you to scale the mold to fit any panel size before slicing.