Introduction
Creating immersive ASMR content requires more than soothing sounds; visual lighting plays a crucial role in establishing mood and clarity. This guide will teach readers how to design a professional‑looking lighting setup using only a smartphone and a few carefully chosen accessories. By following each step, one can achieve consistent, flattering illumination that enhances the viewer’s sensory experience while remaining budget‑friendly.
The techniques described are applicable to any environment, whether a home studio, a bedroom, or a portable setup for on‑the‑go recordings. Readers will learn why specific lighting tools outperform generic alternatives, and how to integrate them seamlessly into their workflow.
What You’ll Need
- ALTSON 60 LED Selfie Light – 60 LEDs, CRI 97+, rechargeable 2200 mAh battery, 3 modes, 10 brightness levels. Price: $13.77, Rating: 4.5/5 (6,185 reviews).
- NEEWER 60 LED Clip‑On Selfie Light – 60 SMD LEDs, CRI 95+, 2000 mAh battery, dual‑clip design, 10%‑100% dimming. Price: $26.09, Rating: 4.7/5 (7,239 reviews).
- OLRPT 60 LED Clip‑On Selfie Light – 60 LEDs, 5000 mAh battery, 3 modes, 10 brightness levels, front & back clips. Price: $15.99, Rating: 4.6/5 (2,352 reviews).
- Newmowa 60 LED Clip‑On Selfie Light – 60 LEDs, 2000 mAh battery, micro‑USB/Type‑C charging, 3 modes, flashlight function. Price: $20.92, Rating: 4.6/5 (13,137 reviews).
- DUIDESHI 90 LED Selfie Light – 90 LEDs, CRI 95+, 2‑12 h battery life, 3 color temperatures. Price: $9.99, Rating: 4.4/5 (1,588 reviews).
- Smartphone with a good camera, tripod or stable surface, and a quiet room with minimal ambient light.
Step 1: Choose a Quiet, Controlled Environment
Begin by selecting a room where external noises are limited and where you can control natural light sources. Close blinds or curtains to prevent fluctuating daylight from washing out your scene. Position a soft rug or carpet to absorb echo, which complements the ASMR audio quality.
Even with perfect lighting, unwanted background sounds can diminish viewer immersion. Therefore, consider using a portable sound‑absorbing panel or a folded blanket behind the recording area to reduce reflections.
Step 2: Set Up Your Primary Light Source
The core of any ASMR visual is a soft, even fill light that highlights the subject without creating harsh shadows. For this purpose, the ALTSON 60 LED Selfie Light is an excellent choice because its CRI 97+ reproduces colors accurately, and its 160° rotatable panel allows precise positioning.
- Key Features: 60 LEDs, 3 light modes (White, Natural, Warm), 10 brightness levels, 15 hours standby, pocket‑size (3.9×2.8×0.78 in).
- Why It Works: The high CRI ensures skin tones appear natural, while the adjustable color temperature lets you match the ambient mood of your ASMR theme.
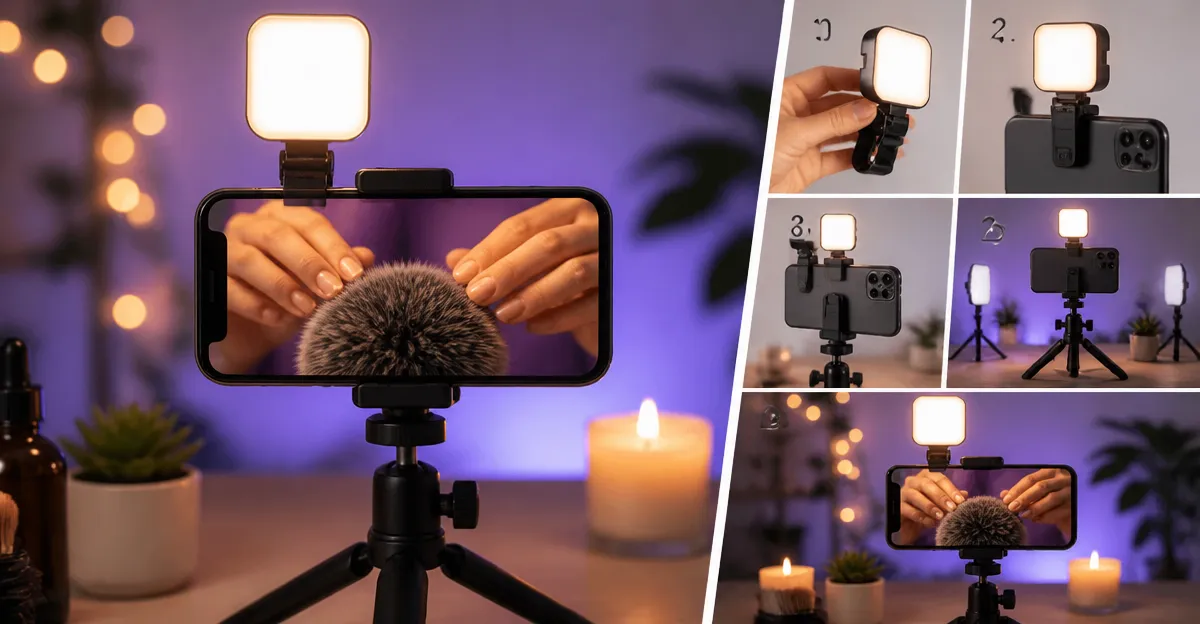
- Installation: Clip the light onto the top edge of your smartphone or attach it to a tripod using the included ¼‑inch adapter. Set the panel to a 45° angle to create a gentle fill.
If a slightly higher output is required, the OLRPT 60 LED Clip‑On Selfie Light provides a larger 5000 mAh battery, allowing extended recording sessions without recharging. Its dual‑clip design also enables placement on a laptop screen for multi‑camera setups.
Step 3: Add a Secondary Accent Light
To create depth, introduce a secondary light that serves as a rim or accent. The NEEWER 60 LED Clip‑On Selfie Light excels in this role because of its flicker‑free dimming and ability to switch between warm and cool tones.
- Key Features: 60 SMD LEDs, 95+ CRI, 2000 mAh battery, 10%‑100% dimming, front & back clips.
- Why It Works: By setting this light to a low‑intensity warm mode and positioning it behind the primary source, you create a subtle halo that separates the subject from the background.
- Installation: Use the back clip to mount the light on the rear of the smartphone or attach it to a nearby surface with the ¼‑inch screw holes.
For creators who prefer a single‑handed setup, the Newmowa 60 LED Clip‑On Selfie Light offers a built‑in flashlight mode, useful for quick adjustments in low‑light environments without swapping devices.
Step 4: Adjust Color Temperature and Brightness
ASMR videos often aim for a calming atmosphere; therefore, warm light (≈3000K) is commonly preferred. Use the primary light’s mode selector to choose “Warm Yellow” or “Natural” depending on the desired mood. Then fine‑tune brightness to approximately 30‑40% of maximum, which reduces harsh glare while maintaining sufficient illumination for the camera sensor.
When using the DUIDESHI 90 LED Selfie Light, you can exploit its 2700K‑6500K temperature range to match the primary light precisely. Set the DUIDESHI unit to the same temperature and lower its brightness to 20% to act as a subtle background glow.
Step 5: Position Your Smartphone and Record
Mount the smartphone on a stable tripod or a stack of books at eye level. Ensure the camera lens is unobstructed by the light clips; the ALTSON and OLRPT lights feature front clips that leave the camera view clear. Activate “Manual” exposure mode in your camera app, locking white balance to the temperature you selected.
Before recording, perform a short test clip while listening to the audio through headphones. Verify that the lighting is even, that there are no hotspots, and that the background remains subdued. Adjust the secondary accent light if the subject appears flat.
Tips & Pro Tips
- Use a diffuser (e.g., a thin white parchment) over the LED panel to soften any remaining hotspots.
- Charge all lights fully at least one hour before recording; the ALTSON light offers up to 15 hours standby, ensuring uninterrupted sessions.
- When filming for extended periods, rotate between the primary and secondary lights to avoid battery drain.
- Consider a simple white backdrop to reflect light evenly, enhancing the three‑dimensional feel of the ASMR setup.
Troubleshooting
Problem: Flickering or inconsistent brightness.
Solution: Verify that the light is set to “steady” mode (most units default to constant output). If using a USB power source, ensure it supplies a stable 5 V output; cheap chargers can introduce fluctuations.
Problem: Overexposed skin tones.
Solution: Reduce the primary light’s brightness to below 40% and switch to a warmer temperature. Adding a diffuser can also mitigate over‑exposure.
Conclusion
By following these five steps, one can construct a reliable ASMR lighting setup using only a smartphone and a selection of affordable clip‑on LED lights. The recommended products provide high CRI, adjustable temperature, and portable power, all of which contribute to a professional visual aesthetic without requiring expensive studio equipment. Implement the tips, test your configuration, and enjoy creating soothing, high‑quality ASMR content.
Products Mentioned in This Guide
Frequently Asked Questions
What type of lighting is best for ASMR videos filmed with a smartphone?
A soft, diffused LED light with a high CRI (95+), like a 60‑LED selfie light, provides even illumination without harsh shadows.
Can I achieve professional‑looking ASMR lighting without expensive studio gear?
Yes, using a rechargeable LED selfie light, a clip‑on mount, and simple diffusion (e.g., a white sleeve) can produce studio‑quality results on a budget.
How do I prevent flicker when recording ASMR lighting on a smartphone?
Choose a light with a high refresh rate (≥200 Hz) or a DC‑powered LED that syncs with the phone’s frame rate to eliminate flicker.
What is the ideal placement of the LED light for flattering facial lighting?
Position the light at a 45‑degree angle above and slightly in front of the subject to create soft shadows and a three‑dimensional look.
Do I need additional accessories to diffuse the LED light for ASMR videos?
A simple diffuser such as a white parchment paper or a softbox attachment smooths the light, reducing hotspots and enhancing a calming visual vibe.