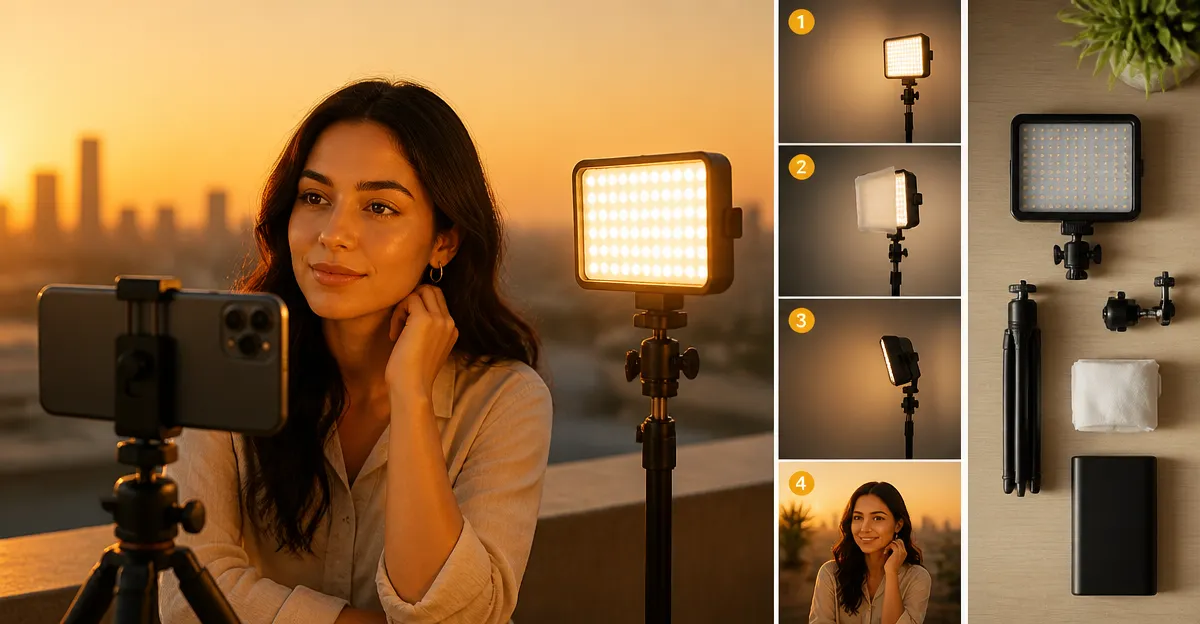
How to Recreate Golden Hour Lighting on Your Smartphone Using LED Panels
Introduction
Golden hour lighting is prized for its warm, soft glow that enhances skin tones and adds depth to any scene. Many creators struggle to capture this effect when the sun is not cooperating, especially when shooting with a smartphone. This guide explains how to simulate golden hour light using portable LED panels, enabling consistent, high‑quality results regardless of the time of day. Readers will learn which tools are essential, how to position and adjust them, and which subtle techniques produce the most natural‑looking illumination.
By following the steps below, one can transform a plain indoor setting into a warm, sun‑kissed environment that rivals the natural golden hour. The approach works for video recordings, live streams, TikTok clips, and product photography alike. The guide also highlights affordable LED solutions that have proven performance in real‑world reviews.
What You’ll Need
- Two LED panels with adjustable color temperature and brightness (e.g., NiceVeedi 2‑Pack LED Video Light Kit or NEEWER 9" LED Video Light Panel)
- Smartphone with manual camera controls or a third‑party camera app
- Tripod or stable surface for the phone
- Optional diffusion material (white parchment paper or a softbox)
- USB power source (wall charger, power bank, or laptop)
All of the LED panels listed are USB‑powered, lightweight, and include stands that can be adjusted to match the height of a typical shooting table.
Step 1: Set Up Your Shooting Space
Begin by selecting a location with a neutral background and minimal ambient light. A plain wall or a backdrop cloth works well because it prevents unwanted color casts. Position your smartphone on a tripod at eye level, ensuring the lens faces the area where the subject will stand. If a tripod is unavailable, place the phone on a stable stack of books and use a small piece of tape to keep it steady.
At this stage, the lighting environment is intentionally dark so that the LED panels become the primary light source. Turn off overhead fluorescents and close any windows that let in harsh daylight. The goal is to have full control over the color temperature and intensity of the light you will introduce.
Step 2: Choose the Right LED Panel for Warm Light
Golden hour is characterized by a color temperature between 2,800 K and 3,500 K. The NiceVeedi 2‑Pack LED Video Light Kit offers three preset temperatures—2,800 K, 4,800 K, and 6,500 K—allowing you to select the warmest setting directly. Each panel contains 356 LED beads, delivers 15 W of power, and boasts a CRI of 97+, which ensures accurate color rendering. Priced at $47.99 with a 4.3‑star rating from over 7,000 reviewers, this kit provides excellent value for creators on a budget.
If you prefer a more compact solution, the NEEWER 9" LED Video Light Panel offers a temperature range of 3,200 K to 5,600 K. Although its lowest temperature is slightly higher than the ideal golden hour, the panel’s precise 1% adjustment increments enable you to dial the warmth down to a pleasing hue. This model is priced at $44.99 and carries a 4.7‑star rating from 854 users, indicating strong satisfaction.
Select the panel that best matches your space and budget, then unpack the unit and place it on the included tripod stand.
Step 3: Position the LED Panels for Natural Fall‑off
Golden hour light typically comes from a low angle, mimicking the sun just above the horizon. Place the first LED panel about 45 degrees to the left of the subject and elevate it to roughly the height of the subject’s shoulders. Tilt the panel downward by 15–20 degrees so that the light falls gently across the face and shoulders, creating a soft shadow on the opposite side.
For a more three‑dimensional effect, add a second panel on the right side at a lower intensity. Set this fill light to the same warm temperature but reduce the brightness to 30–40% of the key light. The NiceVeedi kit includes a remote dimmer that lets you adjust brightness from 10% to 100% in single‑button increments, making it simple to achieve the desired balance.
When using the NEEWER 9" panel, the built‑in knobs allow fine‑tuned control of both brightness and temperature. Set the brightness to approximately 70% for the key light and 30% for the fill light, then lock the knobs to prevent accidental changes during recording.
Step 4: Diffuse the Light for Softness
Direct LED output can appear harsh, especially when the source is close to the subject. To emulate the gentle diffusion of sunrise, attach a thin sheet of white parchment paper or a softbox diffuser to the front of each panel. The NiceVeedi panels feature a thickened light shell that already provides some diffusion, but adding an extra layer will further soften shadows.
If you own the NEEWER 2‑Pack 660 LED Video Light Kit, you can use the included barn doors to control spill and direct the light precisely. The metal barndoor design shapes the beam without the need for additional accessories, and the U‑shaped bracket permits 360° rotation for exact placement.
Remember to secure the diffusion material with tape or clips so that it does not shift during filming.
Step 5: Adjust White Balance on Your Smartphone
Even with the LED set to a warm temperature, the smartphone camera may interpret the scene incorrectly. Open the manual camera mode or a third‑party app that allows custom white balance settings. Set the white balance temperature to match the LED’s temperature (e.g., 3,200 K). If the app permits Kelvin adjustments, fine‑tune until the skin tones appear natural and the background retains a subtle warm glow.
Some phones also provide a “warm” picture style that can be combined with exposure compensation to avoid over‑brightening the highlights. Aim for a slight under‑exposure of –0.3 EV to preserve detail in bright areas while maintaining the warm atmosphere.
Step 6: Test and Refine Your Setup
Record a short test clip of the subject speaking or moving. Review the footage on a larger screen to assess shadow direction, color temperature, and overall exposure. If the shadows appear too harsh, increase diffusion or lower the key light brightness by 10% increments. If the skin looks overly orange, raise the temperature by 200 K or add a small amount of cooler fill light.
Both the NiceVeedi and NEEWER panels provide remote or knob‑based adjustments that can be made without interrupting the recording. This flexibility allows you to make real‑time corrections while maintaining a professional workflow.
Tips & Pro Tips
- Use a bounce surface. Position a white foam board opposite the key light to reflect a secondary warm glow onto the subject’s shadow side, adding depth without additional hardware.
- Maintain consistent power. Connect the LED panels to a reliable USB power bank (minimum 5 V, 2 A) to avoid flicker caused by fluctuating wall outlets.
- Mind the distance. For the NiceVeedi panels, a distance of 2‑3 feet yields soft, even illumination; moving the panel closer will increase intensity but also hardness.
- Employ a color checker. If you frequently shoot product videos, a small color checker card placed in the frame can help you calibrate white balance quickly.
- Consider the NEEWER Basics 2‑Pack LED Panel Lights for on‑the‑go streaming. These compact lights are only 6.2 oz each, feature bi‑color filters, and include a 10‑level dimmer, making them ideal for quick adjustments during live broadcasts.
Troubleshooting
| Problem | Possible Cause | Solution |
|---|---|---|
| Flickering light | Inadequate power supply | Use a wall charger rated at 5 V/2 A or a high‑capacity power bank. |
| Color looks too cool | LED set to higher temperature | Lower the temperature setting to the 2,800 K or 3,200 K range. |
| Shadows are too harsh | Insufficient diffusion | Attach additional diffusion material or increase distance between light and subject. |
Conclusion
Recreating golden hour lighting on a smartphone is achievable with the right combination of adjustable LED panels, proper positioning, and careful white‑balance control. By following the six steps outlined above, creators can produce warm, flattering light that enhances both people and products. The recommended panels—NiceVeedi 2‑Pack LED Video Light Kit, NEEWER 9" LED Video Light Panel, and NEEWER 2‑Pack 660 LED Video Light Kit—offer reliable performance, intuitive controls, and price points suitable for hobbyists and professionals alike. Experiment with diffusion, bounce, and fill light to refine the effect, and enjoy consistent, cinematic results any time of day.
Products Mentioned in This Guide
Frequently Asked Questions
What LED panel features are essential for mimicking golden hour lighting on a smartphone?
Choose panels with adjustable color temperature (around 3200‑4000K) and dimmable brightness to fine‑tune warm, soft light.
How should I position LED panels to achieve a natural golden hour effect?
Place one panel at a 45-degree angle to the subject as a key light and a second panel opposite, slightly lower, as a fill to soften shadows.
Can I use affordable LED panels for professional‑looking results?
Yes, budget-friendly panels with CRI 90+ and temperature control can produce high‑quality, warm lighting when set correctly.
Do I need any accessories besides LED panels for smartphone shooting?
A diffuser or softbox, a tripod for the phone, and a color gel (if needed) help create even, flattering illumination.
Is it possible to maintain consistent golden hour lighting for video and live streams?
By locking the panels’ temperature and brightness settings, you can keep the warm tone stable across all recordings.