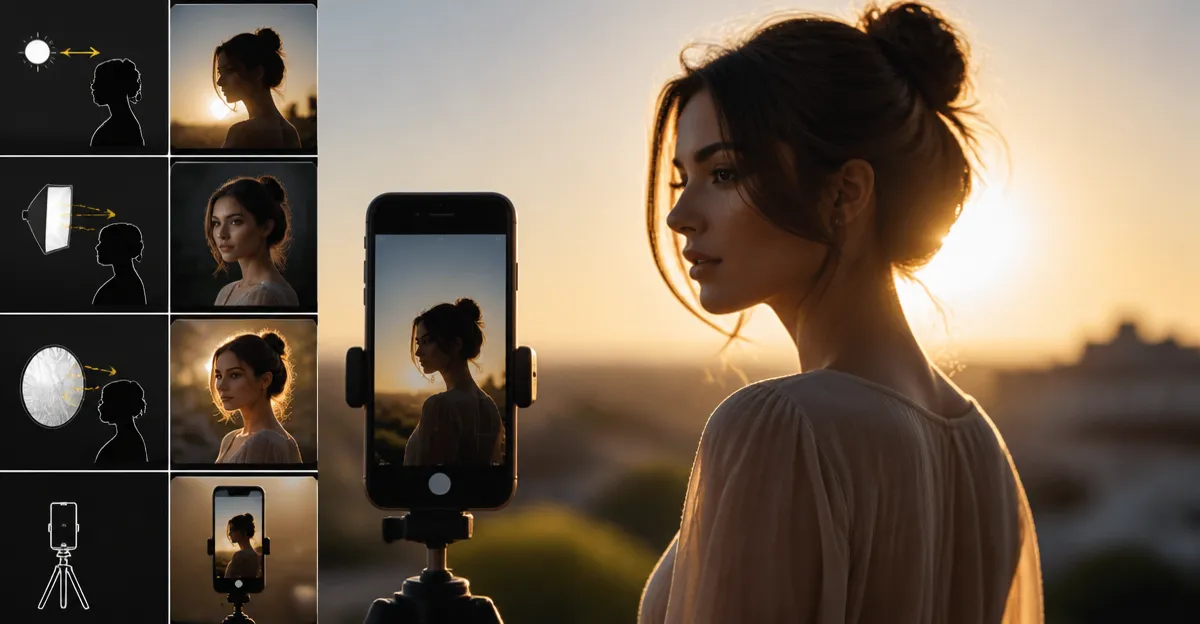
How to Master Edge and Backlight Techniques for Stunning Smartphone Portraits
In this guide, the reader will learn how to create dramatic edge‑lit and backlit portrait photographs using a smartphone. Mastering these lighting techniques can transform ordinary snapshots into compelling visual stories, enhance subject separation, and add depth to any composition. The instructions combine fundamental photographic principles with practical tools such as portable lights and a concise photography handbook. By following each step, one will be able to produce professional‑looking portraits without investing in expensive camera equipment.
What You'll Need
- A smartphone with a capable camera (iPhone or Android).
- A reliable lighting source – options include the ALTSON Portable Selfie Light, the UBeesize 12" Ring Light, the WisaKey RGB Ring Light, or the Singwil Portable Selfie Light.
- A stable support such as a tripod or a phone holder that comes with the ring lights.
- The book Smart Phone Smart Photography for reference on composition and post‑processing.
- Optional accessories: a Bluetooth remote for hands‑free shooting and a USB power source for continuous lighting.
Step 1: Understand Edge and Backlight Principles
Edge lighting, also known as rim lighting, places a light source behind the subject to outline the silhouette. Backlighting positions the light directly opposite the camera, creating a halo effect that separates the subject from the background. Both techniques rely on contrast, so it is essential to control exposure and avoid over‑exposure of the background. One should start by observing natural light at sunrise or sunset, where the sun naturally creates rim effects. The concepts are explained in depth in Smart Phone Smart Photography, a paperback priced at $24.99 with a 4.6‑star rating from 482 reviews.
Step 2: Prepare Your Shooting Environment
Choose a location where the background can be controlled. A plain wall, a dark curtain, or an outdoor setting with a distant horizon works well. Remove clutter that could distract from the subject. If shooting indoors, position a window or a soft‑box to act as the primary backlight source. When natural light is insufficient, a portable LED light will provide consistent illumination.
Recommended tools for this stage include the ALTSON Portable Selfie Light. It offers 60 LEDs with a high color rendering index (CRI 97+), ensuring that skin tones appear natural. The device features three light modes—White, Natural, and Warm—covering a color temperature range from 2500K to 6500K. With ten brightness levels, one can fine‑tune the intensity to match ambient conditions. The ALTSON light costs $13.94 and holds a 4.5‑star rating from 6,882 reviews.
Step 3: Mount and Position the Light Source
Secure the light on a tripod or attach it to the phone using the built‑in clip. For edge lighting, place the light behind the subject at a 45‑degree angle relative to the camera axis. The light should be high enough to create a thin rim along the shoulders and head. If using a ring light, extend the tripod to a height that aligns the light with the subject's eye level.
The UBeesize 12" Ring Light includes a 62‑inch tripod and a Bluetooth remote, making it ideal for precise positioning. Its 240 LEDs deliver even illumination, and the touch‑controlled panel offers five color modes and ten brightness levels. Priced at $32.99 with a 4.4‑star rating from 99,073 reviews, it provides a stable platform for both portrait and overhead shots.
Step 4: Adjust Color Temperature and Brightness
Set the light mode according to the desired mood. Warm light (around 2800K) adds a golden halo, suitable for evening portraits. Natural light (around 4500K) mimics daylight, while cool light (up to 6500K) creates a crisp, modern feel. Adjust brightness so that the subject remains properly exposed while the background stays slightly underexposed, preserving the rim effect.
If a broader color palette is required, the WisaKey RGB Ring Light provides 96 RGB modes plus three essential white modes. Its stepless dimming from 1% to 100% allows precise control. The unit costs $24.99, carries a 4.4‑star rating from 1,147 reviews, and includes a 63‑inch adjustable tripod for versatile height adjustments.
Step 5: Position the Subject and Compose the Shot
Ask the subject to stand or sit with a slight turn away from the camera, allowing the light to outline the side of the face. Encourage a relaxed posture to avoid harsh shadows on the neck. Use the smartphone's grid lines to align the eyes on the upper third of the frame, following the rule of thirds. For edge lighting, keep the camera slightly lower than eye level to accentuate the rim.
When using a smaller, clip‑on light such as the Singwil Portable Selfie Light, attach the clip to the phone and rotate it 120° to illuminate the subject from behind. This light offers 120 LEDs, a brightness range from 2500K to 9000K, and a 5000 mAh battery that lasts up to 15 hours at low brightness. It is priced at $23.99 and has a 4.4‑star rating from 371 reviews.
Step 6: Capture the Image
Set the smartphone camera to manual or pro mode if available. Reduce the ISO to 100–200 to minimize noise, and select an aperture that provides a shallow depth of field (f/1.8–f/2.2). Focus on the eyes, then lock the focus before taking the shot. Use the Bluetooth remote supplied with the ring lights to avoid camera shake.
Take several exposures with varying brightness to ensure at least one correctly exposed rim. Review the images on the phone screen, zooming in to verify that the edge light is smooth and free of hot spots.
Step 7: Post‑Processing for Maximum Impact
Import the selected photos into a mobile editing app such as Lightroom or Snapseed. Adjust the highlights to retain the rim glow while deepening the shadows to increase contrast. If the background appears too bright, apply a subtle vignette. The guide Smart Phone Smart Photography includes a dedicated chapter on post‑production techniques, offering step‑by‑step instructions for enhancing smartphone images.
Tips & Pro Tips
- Use a diffuser (a thin white cloth or a professional diffuser) on the light source to soften harsh edges when the subject is very close to the background.
- When shooting outdoors, position the sun behind the subject during golden hour; supplement with a portable LED if the light is insufficient.
- Experiment with color gels or the RGB modes of the WisaKey light to create artistic silhouettes for creative projects.
- Maintain a consistent distance between the light and the subject; moving the light too close can cause flare, while moving it too far reduces rim intensity.
- Always clean the smartphone lens before shooting to avoid unwanted glare that can diminish the edge effect.
Troubleshooting
Problem: The rim appears uneven or creates hotspots.
Solution: Reduce brightness, add a diffuser, or increase the distance between the light and the subject. Ensure the light is centered behind the subject rather than off‑axis.
Problem: Background is overexposed, washing out the rim.
Solution: Lower the exposure compensation on the smartphone, or use a darker backdrop. Adjust the light's color temperature to a cooler setting to reduce overall brightness.
Conclusion
By mastering edge and backlight techniques, one can transform everyday smartphone portraits into striking visual narratives. The steps outlined above guide the reader from understanding the lighting fundamentals to selecting appropriate tools, positioning the light, capturing the image, and refining it in post‑production. With practice, the combination of a capable smartphone, a portable LED light, and the insights from Smart Phone Smart Photography will enable consistently professional results.
Products Mentioned in This Guide
Frequently Asked Questions
What is the difference between edge lighting and backlighting in smartphone portraits?
Edge lighting highlights the subject’s outline with light from the side, while backlighting places the light source behind the subject to create a halo effect.
Do I need a special smartphone camera to use edge and backlight techniques?
No, any modern iPhone or Android phone with a capable camera can achieve these effects with proper lighting.
Which portable lights work best for edge‑lit and backlit portraits?
Lights such as the ALTSON Portable Selfie Light, UBeesize 12" Ring Light, or WisaKey RGB Ring Light provide adjustable brightness and direction for both techniques.
How can I avoid overexposure when shooting backlit portraits on a phone?
Tap to lock exposure on the subject, lower the exposure slider, or use HDR mode to balance the bright background with the subject.
Can I achieve professional‑looking edge lighting without expensive equipment?
Yes, by positioning a small LED or ring light at a low angle and using a diffuser or bounce surface, you can create dramatic edge lighting with minimal cost.