How to Attach Clip‑On Lenses to Your Phone Without a Case: A Step‑by‑Step, Scratch‑Free Guide
This guide will teach the reader how to mount clip‑on camera lenses on a smartphone without using a protective case. The reader will learn why a case‑free attachment can improve lens alignment, how to protect the phone surface, and which accessories simplify the process. By following the instructions, the reader will be able to achieve professional‑grade results while avoiding scratches or mis‑alignment.
What You'll Need
- A clip‑on lens kit such as the Miao Lab 5‑in‑1 Camera Lens Kit (price $21.99, rating 3.9/5 from 2,238 reviews).
- A microfiber cleaning cloth.
- Isopropyl alcohol wipes (optional, for stubborn residue).
- A small screwdriver or the built‑in screw mechanism that comes with most lens kits.
- A steady surface or tripod mount for the phone.
These items are sufficient to complete the attachment process safely. The lens kits listed below each contain a universal clip that fits most smartphones, making them ideal for case‑free use.
Step 1: Prepare the Phone and Lens Kit
Begin by placing the phone on a clean, flat surface. Ensure that the device is powered off to prevent accidental camera activation. Unbox the chosen lens kit and verify that all components are present. The Miao Lab 5‑in‑1 Camera Lens Kit includes a 198° fisheye lens, a 0.63X wide‑angle lens, a 15X macro lens, a 2X telephoto lens, and a CPL filter, each housed in an aluminum shell that resists impact.
Why this step matters: A powered‑off phone eliminates the risk of software‑induced focus shifts while the user is attaching the lens. Verifying the kit contents prevents missing pieces that could cause instability later.
Step 2: Clean the Camera Area and Lens Surfaces
Using the microfiber cloth, gently wipe the phone's primary camera lens to remove fingerprints, dust, or oil. If residue persists, lightly dampen the cloth with an isopropyl alcohol wipe and repeat. Next, clean the front glass of each lens in the kit. The advanced lanthanide optical glass used in the Keywing 3‑in‑1 Phone Camera Lens Kit (price $19.99, rating 4/5 from 4,651 reviews) is coated to resist smudges, but a clean surface still maximizes clarity.
Why this step matters: Even microscopic particles can cause ghosting or flare, especially when using macro or fisheye lenses that capture a wide field of view. A clean surface ensures the optical glass performs as advertised.
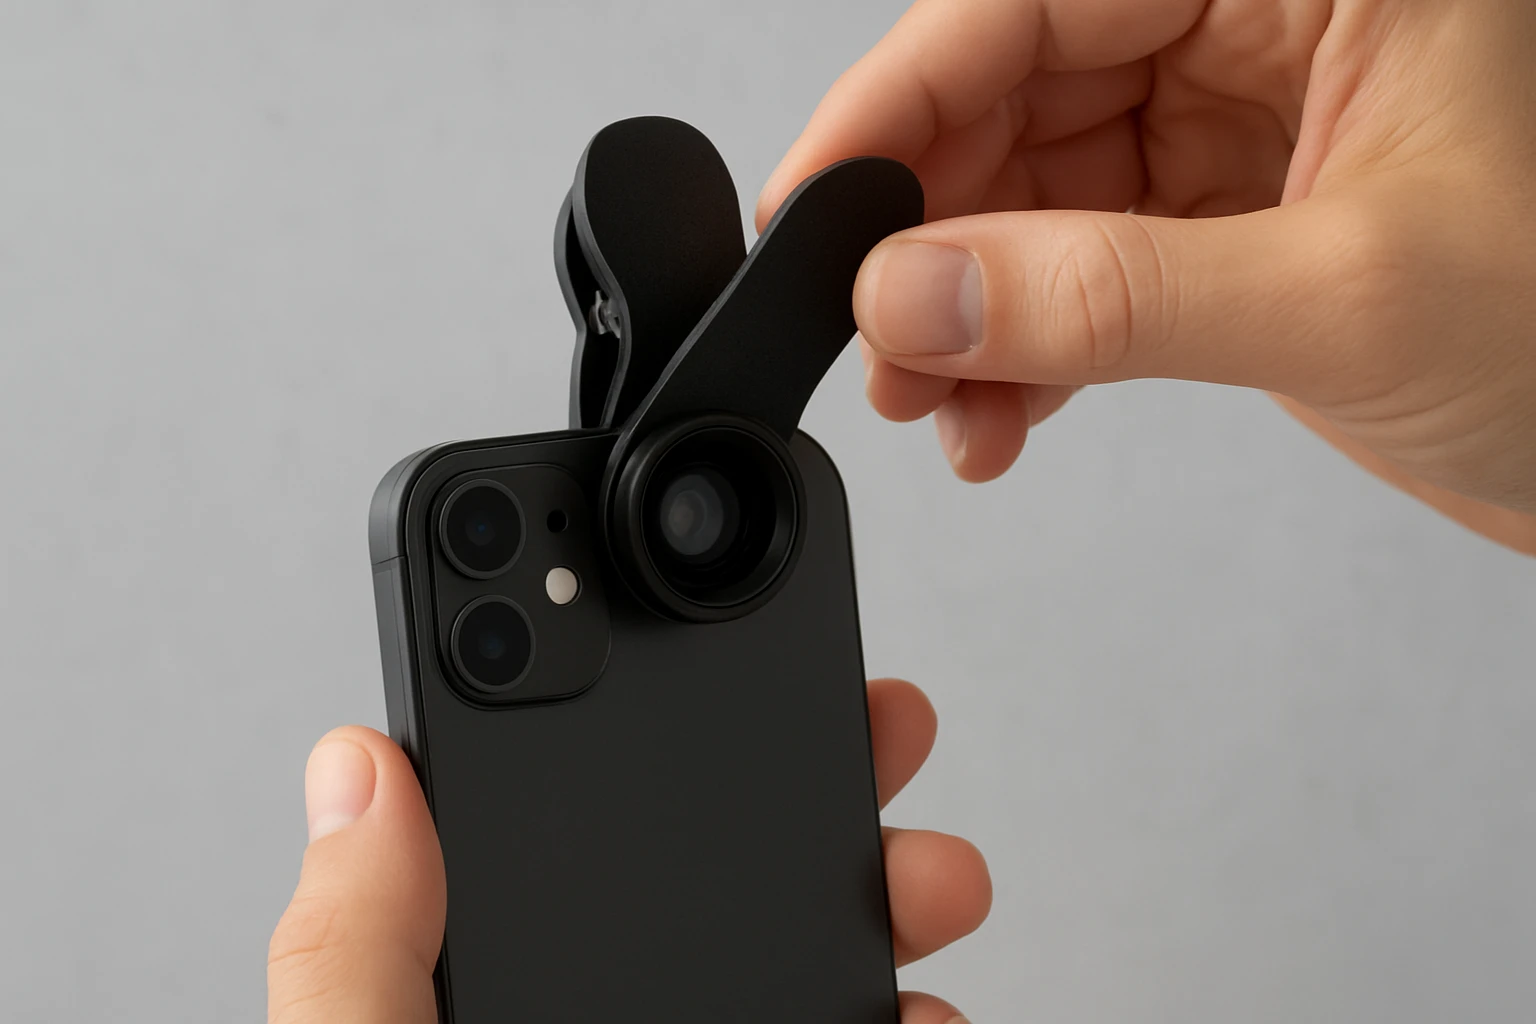
Step 3: Attach the Universal Clip to the Phone
Locate the clip that came with the lens kit. The clip features a rubber‑lined interior that grips the phone without scratching. Position the clip so that the rubber padding contacts the edges of the phone, then gently press the clip onto the device. The clip should snap into place with a firm but not forceful pressure.
If the phone has a protruding camera module, align the clip opening directly over the camera lens. The Mocalaca 11‑in‑1 Phone Lens Kit (price $23.99, rating 3.9/5 from 2,733 reviews) includes a soft‑rubber pad that adapts to various camera heights, making it a reliable choice for phones with recessed lenses.
Why this step matters: A secure clip provides a stable platform for the lens, preventing wobble that could blur images. The rubber padding protects the phone's finish, ensuring a scratch‑free experience.
Step 4: Screw the Desired Lens onto the Clip
Each lens in the kit attaches to the clip via a threaded screw mechanism. Select the lens that matches the intended photographic effect—wide‑angle for landscapes, macro for close‑ups, or fisheye for creative distortion. Align the lens threads with the clip threads and turn clockwise until snug. Do not overtighten; the aluminum shell is designed to hold the lens securely with moderate torque.
The Godefa 14‑in‑1 Camera Lens Kit (price $25.99, rating 4/5 from 2,776 reviews) offers a similar screw‑on design but adds a selfie ring light that can be attached after the lens if additional illumination is required.
Why this step matters: Proper threading ensures that the lens remains aligned with the phone's camera sensor. A misaligned lens can introduce vignetting or uneven focus, especially with high‑magnification macro lenses.
Step 5: Verify Alignment and Test the Lens
Open the phone's camera application and switch to the rear camera. Observe the preview screen for any distortion at the edges. If the image appears off‑center, gently loosen the lens, reposition the clip, and retighten. For macro work, move the phone a few centimeters away from the subject until the focus indicator turns green.
When using the CPL filter from the Miao Lab 5‑in‑1 Camera Lens Kit, rotate the filter to reduce reflections on water or glass surfaces. The filter’s polarizing effect is most noticeable at a 45‑degree angle to the light source.
Why this step matters: Real‑time testing allows the user to catch alignment errors before taking critical shots. Adjustments made at this stage prevent wasted time and ensure consistent image quality.
Step 6: Switch Between Lenses Without Removing the Clip
One advantage of a case‑free setup is the ability to change lenses quickly. To swap lenses, loosen the current lens, slide it off, and replace it with the next lens in the series. Because the clip remains attached to the phone, the user avoids repeated handling of the device itself, reducing the risk of scratches.
For rapid changes, keep a small organizer—such as the storage bag included in the Keywing 3‑in‑1 Phone Camera Lens Kit—nearby. This bag prevents lenses from rolling away and provides a convenient location for the screwdriver if needed.
Why this step matters: Maintaining the clip in place preserves the phone's balance and prevents the rubber padding from shifting, which could otherwise cause micro‑scratches during lens changes.
Tips & Pro Tips
- Always attach the clip on a clean surface; dust particles can become trapped between the rubber padding and the phone.
- When shooting in bright sunlight, use the CPL filter to reduce glare on reflective subjects such as water or glass.
- For macro photography, enable the phone's manual focus mode (if available) to fine‑tune the focal distance.
- If the phone has a protective film on the camera lens, remove it before attaching any clip‑on lens to avoid double‑layer distortion.
- Store lenses in the provided case with labels facing outward; this simplifies identification and reduces the time spent searching for the correct lens.
Troubleshooting
Problem: Lens feels loose after attachment.
Solution: Ensure the clip rubber pads are fully seated against the phone edges. If the clip slides, reposition it slightly higher or lower until the pads grip securely.
Problem: Image appears dark or vignetted.
Solution: Verify that the lens is fully screwed in; an incomplete thread can cause light leakage. Also check for smudges on the lens surface.
Problem: Fisheye lens shows black borders.
Solution: Adjust the phone's distance from the subject and zoom out slightly. The 198° fisheye lens from the Miao Lab 5‑in‑1 Camera Lens Kit captures a circular image; cropping in post‑processing can remove unwanted borders.
Conclusion
The reader now possesses a complete, scratch‑free method for attaching clip‑on lenses to a smartphone without a protective case. By preparing the device, cleaning all optical surfaces, securing the universal clip, and correctly threading each lens, the user can achieve high‑quality results across a variety of photographic scenarios. The included tips and troubleshooting section further ensure that common obstacles are resolved quickly. With these tools and techniques, the reader can explore creative photography while preserving the integrity of the phone's finish.
Products Mentioned in This Guide
Frequently Asked Questions
Can I attach clip‑on lenses to my phone without using a case?
Yes, a case‑free method uses the lens kit’s built‑in clip and a small screw to secure the lens directly to the phone surface.
What tools are needed to mount a clip‑on lens safely?
You need the lens kit’s universal clip, a microfiber cloth, optional isopropyl wipes, and a small screwdriver or the kit’s screw mechanism.
How do I prevent scratches when clipping a lens onto my phone?
Clean the phone with a microfiber cloth, optionally wipe with isopropyl alcohol, and ensure the clip’s rubber pads are aligned before tightening.
Will a case‑free attachment affect lens alignment?
Attaching without a case often improves alignment because the lens sits directly over the camera sensor without extra bulk.
Can I use a tripod with a case‑free clip‑on lens setup?
Yes, place the phone on a steady surface or tripod mount after the lens is secured to maintain stability during shooting.