How to Balance Your Smartphone Rig: Essential Weight‑Balancing Tips for Stable, Professional Video
Introduction
Creating smooth, cinematic footage with a smartphone requires more than just good lighting and composition; it demands a well‑balanced rig that distributes weight evenly. This guide explains the principles of weight distribution, demonstrates how to assemble a balanced setup, and highlights tools that simplify the process. Readers will learn how to evaluate their equipment, attach accessories strategically, and fine‑tune balance for optimal stability. Mastering these techniques will reduce unwanted shake, extend battery life, and elevate the overall production quality.
What You’ll Need
- Hohem iSteady X3 SE – portable 3‑axis gimbal stabilizer (price $54.99, rating 4.2/5)
- Movo SPR‑20 – foldable smartphone video rig cage (price $12.95, rating 4.3/5)
- Lightweight external microphone (optional for improved audio)
- LED panel or ring light (optional for consistent illumination)
- Small counterweight such as a carbon‑fiber strip or sandbag
- Allen key or small screwdriver (often included with the rig)
Step‑by‑Step Instructions
Step 1: Evaluate the Smartphone and Accessories
Begin by measuring the weight of the smartphone, including any case or lens attachment that will remain during shooting. Record this weight because it forms the baseline for balancing the entire rig. Next, list any additional accessories such as microphones, lights, or external batteries, noting their individual masses. Understanding the cumulative weight enables the creator to anticipate where the center of gravity will shift once the rig is assembled.
For most modern flagship phones, the weight ranges between 0.15 lb and 0.20 lb. Adding a small LED panel may increase the total by 0.05 lb, while a directional microphone can add another 0.07 lb. These figures are critical when selecting a gimbal with sufficient payload capacity. The Hohem iSteady X3 SE supports up to 0.66 lb, making it suitable for most smartphones and modest accessories.
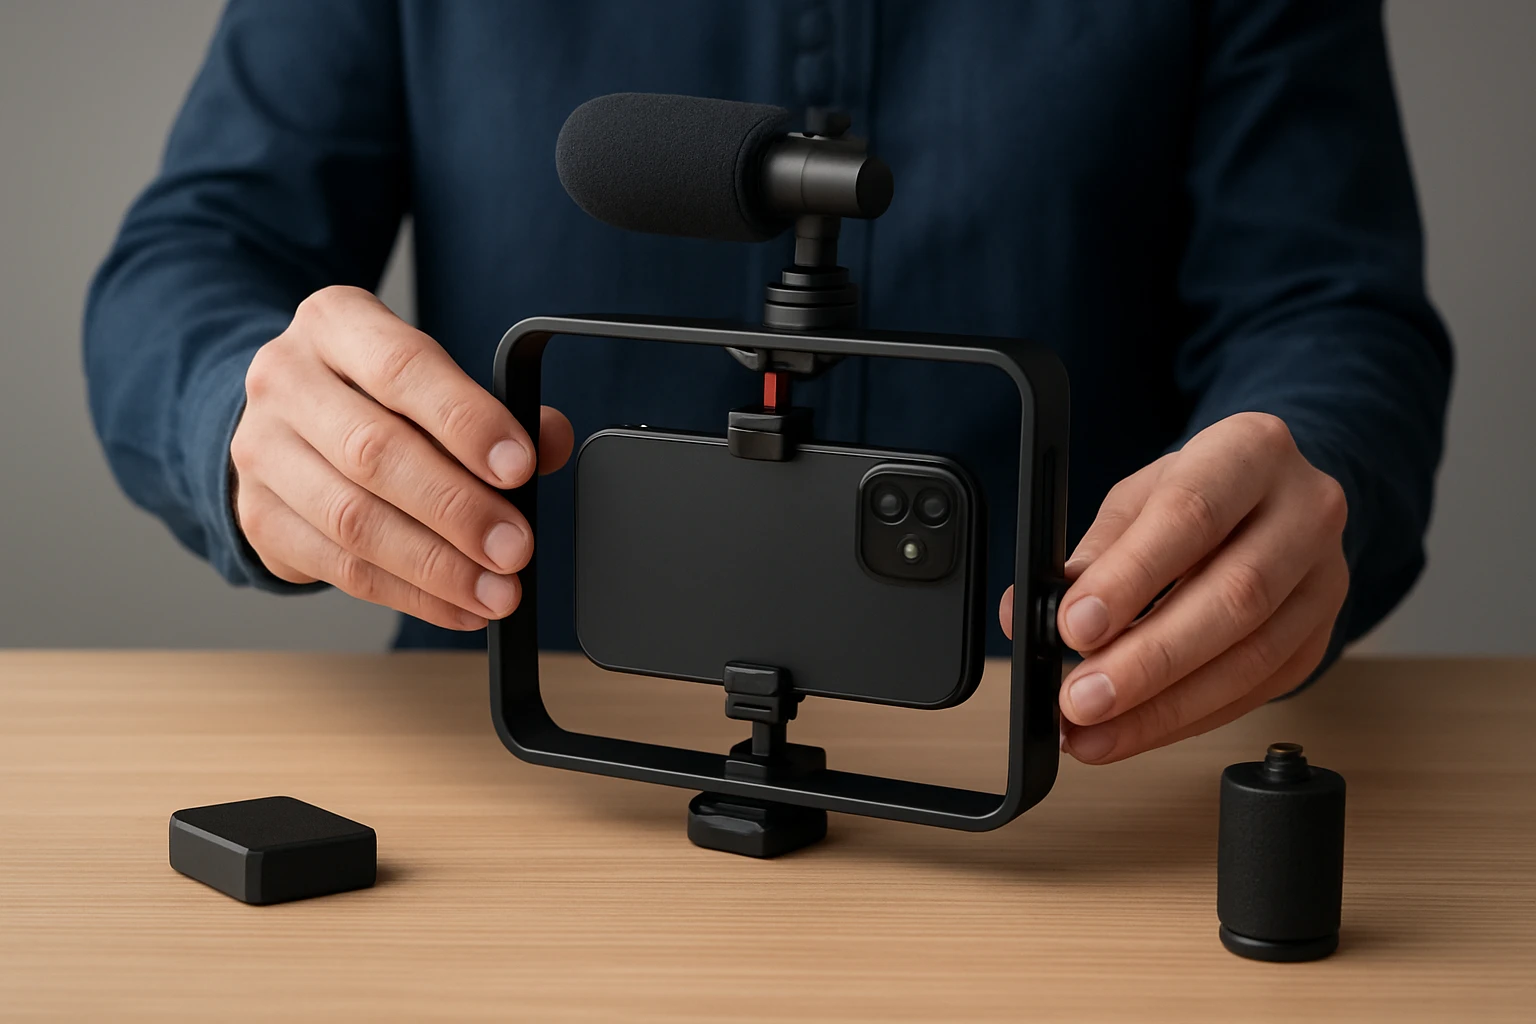
Step 2: Assemble the Movo SPR‑20 Rig Cage
Unfold the ABS cage of the Movo SPR‑20 and lock the two hand‑grip extensions into place. The flexible design allows the cage to transition from a compact single‑hand configuration to a robust two‑hand grip, providing a stable base for the smartphone. Insert the phone into the adjustable holder, ensuring the width is set to accommodate the device without excessive pressure. Tighten the holder screws until the phone is secure but not distorted.
The rig includes four cold‑shoe mounts and four 1/4" threaded ports, which are essential for attaching accessories without compromising balance. Mount a lightweight microphone on the left cold shoe and an LED panel on the right, keeping the mass distribution symmetrical. Symmetry reduces torque on the gimbal motor and extends battery life during prolonged shoots.
Step 3: Attach the Hohem iSteady X3 SE Gimbal
Slide the gimbal’s mounting plate onto the top of the SPR‑20 cage, aligning the screw holes with the rig’s 1/4" threaded ports. Secure the plate with the supplied Allen key, confirming that the connection is tight and level. The gimbal’s advanced iSteady 8.0 technology provides three‑axis stabilization, which compensates for minor shifts in weight distribution. By mounting the gimbal after the rig is fully assembled, the creator ensures that the center of gravity is as close to the gimbal’s pivot point as possible.
Power the gimbal using its built‑in 11‑hour battery; a full charge requires only two hours, allowing for extensive field use. The detachable magnetic remote controller can be positioned on the rig’s side rail, enabling hands‑free operation up to 32.81 feet away. This feature is particularly useful when the creator wishes to capture self‑portrait shots without disturbing the balance of the rig.
Step 4: Fine‑Tune Balance Using Counterweights
With the smartphone, rig, and gimbal locked together, gently lift the assembly by the handle. Observe whether the rig tilts forward, backward, or to either side. If the front end drops, attach a small counterweight to the rear cold shoe or to the back of the gimbal’s mounting plate. Conversely, if the rear end lowers, add weight to the front, such as a compact battery pack. Adjustments should be made in increments of 0.02 lb to avoid over‑compensation.
After each adjustment, re‑run the gimbal’s auto‑balance routine through the Hohem Joy app. The app provides real‑time feedback on pitch, roll, and yaw stability, allowing the creator to verify that the rig remains level across all axes. Proper balance minimizes motor strain, reduces noise, and ensures smoother motion when panning or tracking subjects.
Step 5: Test Motion and Record Sample Footage
Perform a series of test movements: walk forward, jog lightly, and execute a 360° pan while monitoring the footage on the smartphone screen. The gimbal’s AI tracking mode, accessible via the Hohem Joy app, can be activated to evaluate how well the system follows moving subjects. If any wobble or jitter persists, revisit the counterweight placement and verify that all screws are tightened.
Record a short clip of at least thirty seconds to assess battery consumption. The iSteady X3 SE’s 11‑hour battery life ensures that a typical one‑hour shooting session will consume only a small fraction of power, provided the rig remains balanced. Review the clip on a computer to confirm that the stabilization meets professional standards.
Tips & Pro Tips
- Use a silicone phone case to add a thin layer of grip without significantly increasing weight.
- When shooting in windy conditions, add a small windscreen to the microphone to prevent wind‑induced vibration.
- Employ the gimbal’s portrait‑mode switch for vertical videos; this prevents the need to rebalance for each orientation.
- Keep the remote controller’s magnetic attachment surface clean to maintain a strong hold during dynamic movements.
- Schedule regular firmware updates for the Hohem Joy app; improvements often include enhanced stabilization algorithms.
Troubleshooting
Problem: The rig drifts to one side after a few minutes of filming.
Solution: Re‑check all mounting screws for loosening due to vibration. Re‑balance using a lighter counterweight, as excessive weight can cause motor fatigue.
Problem: The gimbal motor emits a grinding noise.
Solution: Verify that the smartphone’s center of mass aligns with the gimbal’s pivot. Remove any unnecessary accessories that shift the balance beyond the payload limit.
Problem: Remote controller does not respond at the advertised distance.
Solution: Ensure there are no metal obstacles between the remote and the gimbal. Replace the battery in the remote if the indicator shows low power.
Conclusion
Balancing a smartphone rig is a systematic process that combines careful weight assessment, strategic placement of accessories, and precise adjustment of counterweights. By following the steps outlined above, creators can achieve stable, professional‑grade video without excessive reliance on post‑production stabilization. The combination of the Hohem iSteady X3 SE and the Movo SPR‑20 provides an affordable yet powerful solution for both beginners and seasoned vloggers. Continued practice and periodic re‑balancing will ensure consistent performance across diverse shooting environments.
Products Mentioned in This Guide
Frequently Asked Questions
Why is weight balancing important for a smartphone rig?
Balanced weight reduces shake, improves stabilization, and helps the gimbal motor work efficiently, extending battery life.
How do I determine the center of gravity on my smartphone rig?
Place the phone and accessories on a flat surface and slide a small rod or ruler underneath until the setup tips equally in both directions, indicating the center point.
Can I use a lightweight external microphone without upsetting the rig’s balance?
Yes, choose a compact mic and attach it close to the phone’s centerline or counterbalance with a small counterweight on the opposite side.
What are the key features to look for in a gimbal for balanced smartphone shooting?
Look for a 3‑axis stabilizer with adjustable tension, a payload capacity slightly above your total rig weight, and quick‑release mounts for easy accessory changes.
How often should I fine‑tune the balance after adding new accessories?
Re‑balance the rig each time you add or remove gear, such as lenses, lights, or microphones, to maintain optimal stability.