How to Build a Fast‑Turnaround E‑commerce Smartphone Studio Workflow for Product Photos
Introduction
In the competitive world of online retail, high‑quality product images can increase conversion rates dramatically. This guide will teach the reader how to create a reliable, fast‑turnaround studio using only a smartphone, a few inexpensive accessories, and proven editing software. By following each step, one will be able to produce consistent, market‑ready photos in under thirty minutes per product. The techniques described are applicable to a wide range of product categories, from small accessories to medium‑sized consumer goods.
What You’ll Need
- A recent smartphone or tablet capable of running Snapseed.
- Portable LED light panel or daylight‑balanced light source.
- Simple backdrop (white paper or fabric).
- Tripod or smartphone holder for stability.
- Editing reference Smart Phone Smart Photo Editing guide.
- Marketing reference Smartphone Smart Marketing guide.
- Photography workflow reference Smartphone Photography guide.
1. Planning Your Shoot
The first step is to define the visual style and technical specifications for each product line. One should decide on image dimensions, background colour, and the number of angles required; most e‑commerce platforms recommend at least three views per item. Create a simple checklist that includes lighting temperature, camera settings, and post‑production goals. This planning document reduces decision fatigue and ensures that every member of the team follows the same standards.
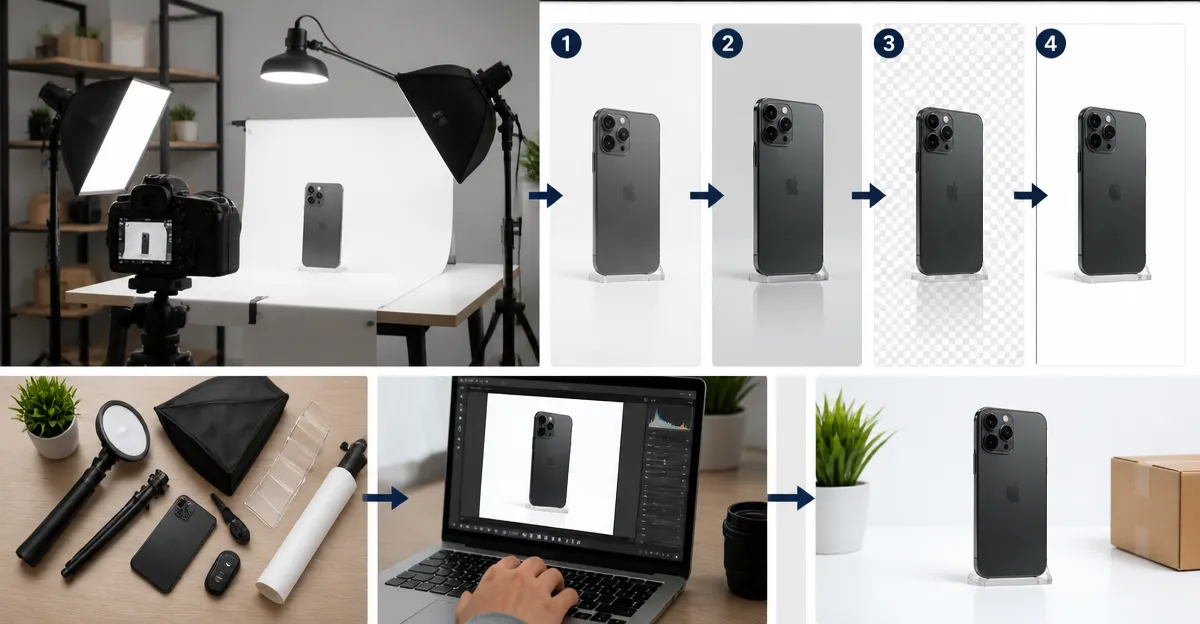
2. Preparing the Workspace
Clear a flat surface and set up a white backdrop that eliminates distracting shadows. Position a portable LED light panel at a 45‑degree angle to the product; daylight‑balanced LEDs provide consistent colour temperature without the need for colour‑correction filters. Mount the smartphone on a tripod to maintain the same framing across multiple shots. A stable setup prevents blurry images caused by hand‑shake and guarantees repeatable results.
3. Capturing Consistent Product Images
Begin by selecting the highest resolution setting on the smartphone camera and disabling any automatic HDR modes that could alter exposure unpredictably. Use the grid overlay to align the product centrally, and lock focus on a representative point to keep the depth of field uniform. Take a minimum of three angles—front, side, and a 45‑degree perspective—to showcase the product’s shape. For reflective items, employ a polarising filter or a diffuser to minimise unwanted glare.
4. Organizing Files for Efficient Editing
Immediately after each shoot, transfer the images to a dedicated folder named with the SKU and date. Consistent naming conventions, such as SKU_front.jpg, SKU_side.jpg, simplify batch processing later on. Back up the raw files to a cloud storage service to prevent data loss and to enable collaboration with remote editors. Maintaining an orderly file structure reduces the time spent searching for specific images during the editing phase.
5. Editing with Snapseed
Snapseed is a free, professional‑grade editing app that runs on both iOS and Android devices. The Smart Phone Smart Photo Editing guide, authored by Jo Bradford, provides a complete workflow for leveraging Snapseed’s tools. The guide, priced at $0.00 (paperback), holds a rating of 4.6 out of 5 based on 91 reviews, indicating reliable instruction. Key features highlighted in the guide include the use of the Tune Image, Details, and Selective tools to enhance exposure, sharpness, and colour balance without introducing artifacts.
Begin by applying the Tune Image tool to adjust brightness and contrast uniformly across all angles. Next, use the Details tool to increase structure, which accentuates texture on fabrics and plastics. Finally, employ the Selective tool to correct any colour casts that may have arisen from mixed lighting conditions. The guide recommends saving edited images as PNG files to preserve maximum quality for e‑commerce platforms.
6. Optimizing Images for E‑commerce Platforms
After editing, the next step is to optimise file size while retaining visual fidelity. The Smartphone Smart Marketing guide, written by Robb and Donna Wallace, offers a concise strategy for compressing images without sacrificing quality. Priced at $4.99 for the Kindle edition, it carries a rating of 4.7 out of 5 from 14 reviewers, reflecting strong approval.
This guide explains the importance of using the sRGB colour profile, which is universally supported by web browsers and marketplaces. It also suggests using online tools such as TinyPNG or the built‑in Snapseed export options to reduce file size to under 500 KB per image. Smaller files improve page‑load speed, which positively influences search‑engine rankings and user experience.
7. Exporting and Uploading to Your Store
With the images optimised, export them in the dimensions required by the target platform—commonly 1500 × 1500 pixels for square product listings. Rename each file to match the SKU, ensuring that the storefront automatically associates the image with the correct product. Upload the files via the platform’s bulk‑import tool to minimise manual effort.
For sellers who manage multiple channels, the Smartphone Photography guide by Victor Lim provides a workflow that integrates with popular inventory management systems. Although priced at $16.90, this paperback has achieved a perfect rating of 5.0 from six reviewers, indicating that the workflow is both effective and easy to follow. The guide recommends creating a master spreadsheet that tracks image URLs, file sizes, and publishing dates, thereby streamlining future updates.
Tips & Pro Tips
- Use a neutral grey card in the first shot to create a custom white‑balance preset for Snapseed.
- Batch‑apply Snapseed filters using the "Copy & Paste" function to maintain consistency across large product catalogs.
- When shooting reflective products, place a thin diffuser between the light source and the item to soften highlights.
- Enable the "Save without watermark" option in Snapseed to avoid unintended branding on final images.
- Schedule a weekly review of image analytics to identify which visuals generate the highest conversion rates.
Troubleshooting
Problem: Images appear overly dark after export.
Solution: Re‑open the file in Snapseed, increase the Brightness slider in the Tune Image tool, and re‑export using the highest quality setting.
Problem: Colour shift when viewing images on different devices.
Solution: Ensure the colour profile is set to sRGB during export, and avoid using CMYK profiles which are intended for print.
Conclusion
By following the systematic workflow outlined above, the reader can produce professional‑grade product photographs using only a smartphone and a handful of affordable tools. The integration of the three recommended Amazon guides provides a solid educational foundation for editing, marketing, and overall photography management. Consistency, speed, and quality are achievable goals when each step is executed with discipline and the right resources.
Products Mentioned in This Guide
Frequently Asked Questions
What basic equipment is required to set up a fast‑turnaround smartphone photo studio?
You need a recent smartphone, a portable LED or daylight‑balanced light, a white backdrop, and a tripod or holder for stability.
How long should it take to shoot and edit a product photo using this workflow?
The process is designed to be completed in under thirty minutes per product, from setup to final export.
Can I edit the images directly on my phone?
Yes, apps like Snapseed allow you to adjust exposure, color, and sharpness right on the device.
Why is a consistent lighting setup important for e‑commerce photos?
Consistent lighting ensures uniform color and shadow across all products, which improves brand professionalism and conversion rates.
What file format and resolution are recommended for online product listings?
Export images as high‑resolution JPEGs (minimum 1500 px on the longest side) with sRGB color space for optimal web display.