How to Repair Common Gimbal Motor Issues: Step-by-Step Troubleshooting & Fixes
Introduction
One often discovers that a drone’s gimbal motor can develop performance problems after extended use or accidental impact. This guide explains how to identify the most frequent motor symptoms, how to safely disassemble the gimbal assembly, and how to replace or repair the faulty component. By following the procedures presented, a reader will be able to restore smooth camera stabilization, reduce vibration, and extend the operational life of a DJI Mini 3 Pro. The information is valuable because it reduces downtime, saves the cost of a full replacement, and enhances confidence when operating professional‑grade aerial equipment.
What You’ll Need
- A set of precision screwdrivers (size PH0 and PH1)
- Non‑magnetic tweezers for handling small parts
- Isopropyl alcohol (90%+) and lint‑free cleaning cloths
- Anti‑static wrist strap to protect electronic components
- YANHAO Gimbal Motor – a genuine replacement motor designed for the DJI Mini 3 Pro gimbal
The listed items are sufficient to complete the repair without requiring additional specialized equipment. The YANHAO Gimbal Motor is recommended because it matches the original specifications, offers a durable wear‑resistant construction, and is priced competitively at $23.27.
Step‑by‑Step Instructions
1. Diagnose the Symptom
Before disassembly, one should confirm that the motor is the source of the problem. Common indicators include:
- Irregular wobble or jitter during flight
- Delayed response when adjusting pitch or yaw
- Audible grinding noises from the gimbal housing
- Complete loss of stabilization on a specific axis
One can verify the issue by connecting the drone to the DJI Fly app, navigating to the gimbal calibration screen, and observing whether the motor fails to reach the commanded position. If the app reports a motor error, the motor likely requires replacement.
2. Prepare the Workspace and Power Down the Drone
It is essential to work in a clean, well‑lit environment to avoid losing tiny screws. One should remove the battery and power switch to eliminate any residual charge. Attach an anti‑static wrist strap to a grounded surface to prevent electrostatic discharge that could damage sensitive circuitry.
During this step, the YANHAO Gimbal Motor will become the primary replacement component. Its high‑quality material composition ensures long service life, and the motor is engineered for easy installation, reducing the risk of re‑assembly errors.
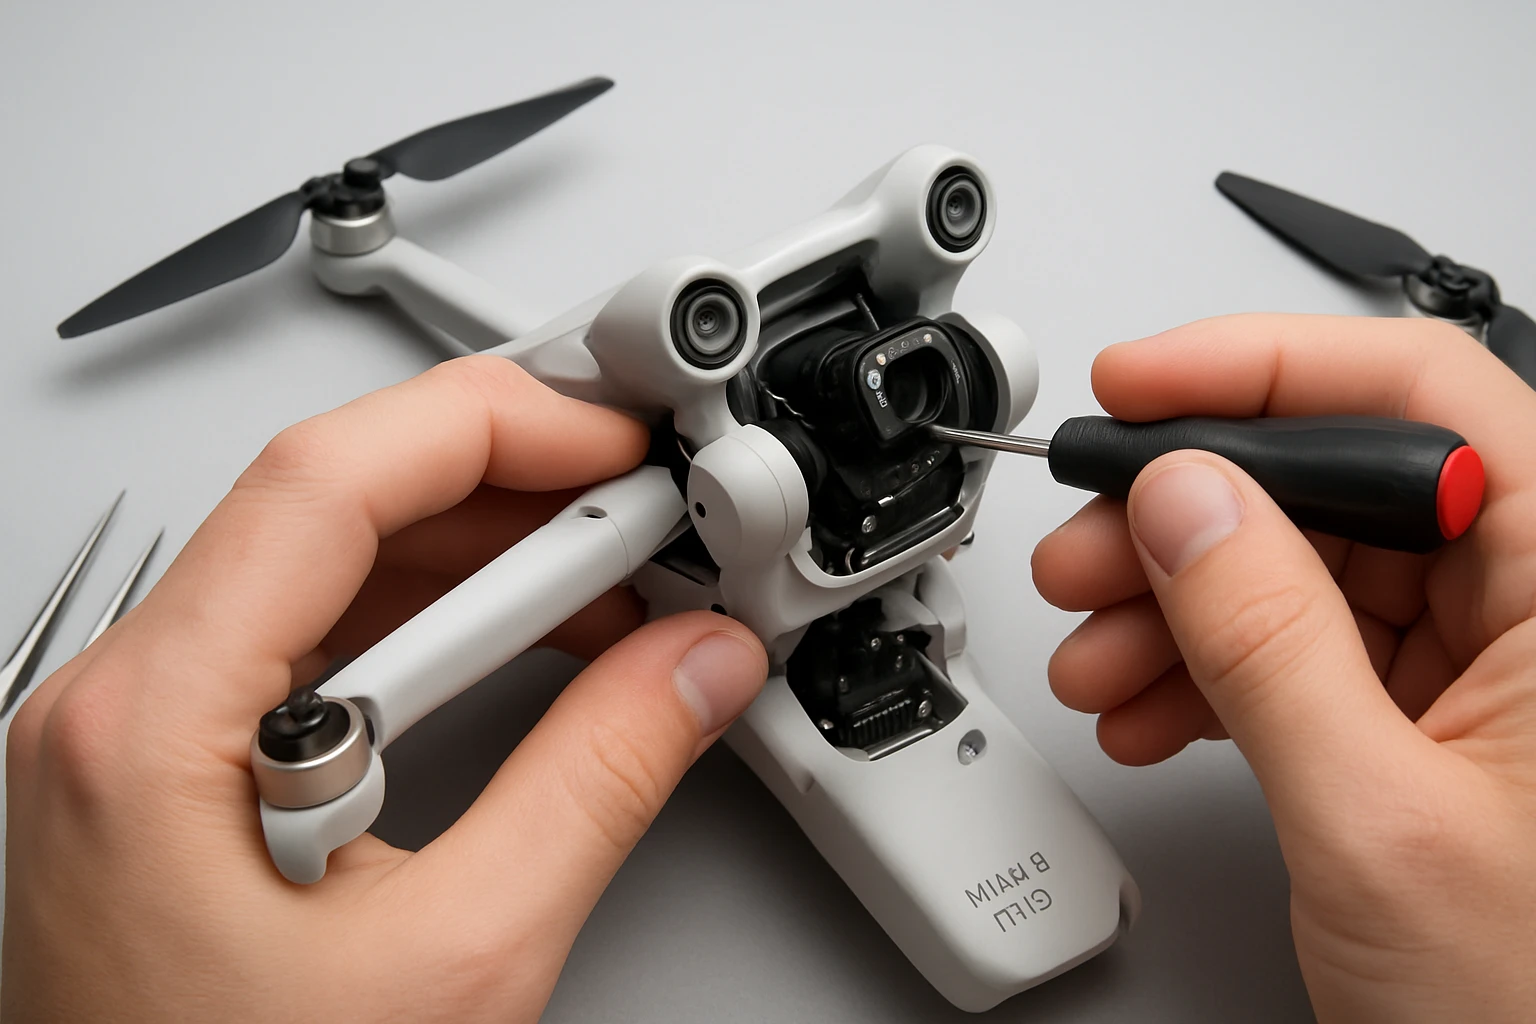
3. Disassemble the Gimbal Housing
- Using a PH0 screwdriver, remove the four screws securing the gimbal cover. Keep the screws in a magnetic tray.
- Gently lift the cover, exposing the motor mounts and wiring harnesses.
- Disconnect the motor power connector by pressing the release tab and pulling the plug straight out.
- Unscrew the motor mounting bolts (typically two) with a PH1 screwdriver.
One should note the orientation of the motor and any alignment pins, as these will guide the correct placement of the replacement unit. The YANHAO Gimbal Motor includes precisely machined axle bearings that align with the original mounting points, simplifying this process.
4. Install the Replacement Motor
- Position the YANHAO Gimbal Motor into the mounting brackets, ensuring that the axle aligns with the existing bearing housings.
- Secure the motor with the two mounting bolts, tightening them to a torque of approximately 0.3 Nm (use a torque‑controlled screwdriver if available).
- Reconnect the motor power connector, confirming that the latch clicks securely.
- Replace the gimbal cover and reinstall the four outer screws.
The replacement motor is described as “solid and durable, long service life,” which means that once installed, one can expect reliable operation for many flight hours. Its wear‑resistant construction reduces the likelihood of future motor degradation under normal operating conditions.
5. Calibrate and Test the Gimbal
After reassembly, reinstall the battery, power on the drone, and launch the DJI Fly app. Navigate to the gimbal calibration routine and follow the on‑screen prompts. The app will move each axis through its full range; one should verify that the motor responds smoothly without stutter.
If the calibration completes successfully, perform a short test flight in a safe area. Observe the video feed for any residual jitter. The YANHAO Gimbal Motor’s precise engineering should provide a stable, vibration‑free platform, confirming that the repair was successful.
Tips & Pro Tips
- Always label screws before removal; the gimbal uses different length screws for the cover and motor mount.
- Apply a small amount of dielectric grease to the motor connector pins to improve electrical contact and protect against corrosion.
- If the motor continues to overheat, inspect the surrounding heat‑sink fins for dust accumulation and clean them with compressed air.
- When handling the replacement motor, avoid touching the axle bearings with bare fingers; oils from skin can reduce bearing lifespan.
Troubleshooting
Problem: Gimbal still exhibits jitter after motor replacement.
Solution: Verify that the motor wiring is fully seated and that no debris remains in the bearing housing. Re‑run the calibration routine, and if the issue persists, check the flight controller firmware version and update if necessary.
Problem: Motor does not spin at all.
Solution: Confirm that the power connector is correctly oriented. Use a multimeter to measure voltage at the motor pins; the reading should be approximately 5 V during operation. Replace the connector if voltage is absent.
Conclusion
One has now learned how to diagnose common gimbal motor problems, safely disassemble the DJI Mini 3 Pro gimbal, replace a faulty motor with a genuine YANHAO Gimbal Motor, and verify proper operation through calibration and test flight. By following the systematic approach outlined in this guide, a drone operator can minimize downtime, avoid costly full‑unit replacements, and maintain professional‑grade image stability.
Products Mentioned in This Guide
YANHAO Gimbal Motor
Price: $23.27
Key Features: High‑quality material, durable wear‑resistant construction, easy installation, solid long‑life performance.
Frequently Asked Questions
What are the most common symptoms of a failing gimbal motor on a DJI Mini 3 Pro?
Typical signs include jerky movements, reduced stabilization, unusual noises, and increased vibration during flight.
Which tools are essential for safely disassembling and repairing a gimbal motor?
A set of PH0 and PH1 precision screwdrivers, non‑magnetic tweezers, isopropyl alcohol, lint‑free cloths, and an anti‑static wrist strap are required.
How can I test a gimbal motor before deciding to replace it?
Run the gimbal calibration in the DJI app and observe motor response; if the motor stalls, clicks, or fails to reach full range, it likely needs repair or replacement.
What safety precautions should I follow when working on the gimbal motor?
Power off the drone, disconnect the battery, wear an anti‑static wrist strap, and handle the motor and circuitry with non‑magnetic tools to avoid damage.
Where can I purchase a genuine replacement motor for the DJI Mini 3 Pro gimbal?
A compatible YANHAO Gimbal Motor can be bought from reputable retailers such as the Amazon link provided in the guide.