How to Shoot 360° Product Spins with Your Smartphone and Lighting: A Step‑by‑Step Guide
This guide explains how to produce smooth 360° product spin videos using a smartphone, a motorized display stand, and professional lighting. Readers will learn to assemble equipment, configure camera settings, capture consistent rotation, and edit footage for e‑commerce platforms. The techniques described are applicable to small businesses, hobbyists, and content creators who require high‑quality visual content without expensive studio gear. By following each step, one can achieve results comparable to dedicated product photography services.
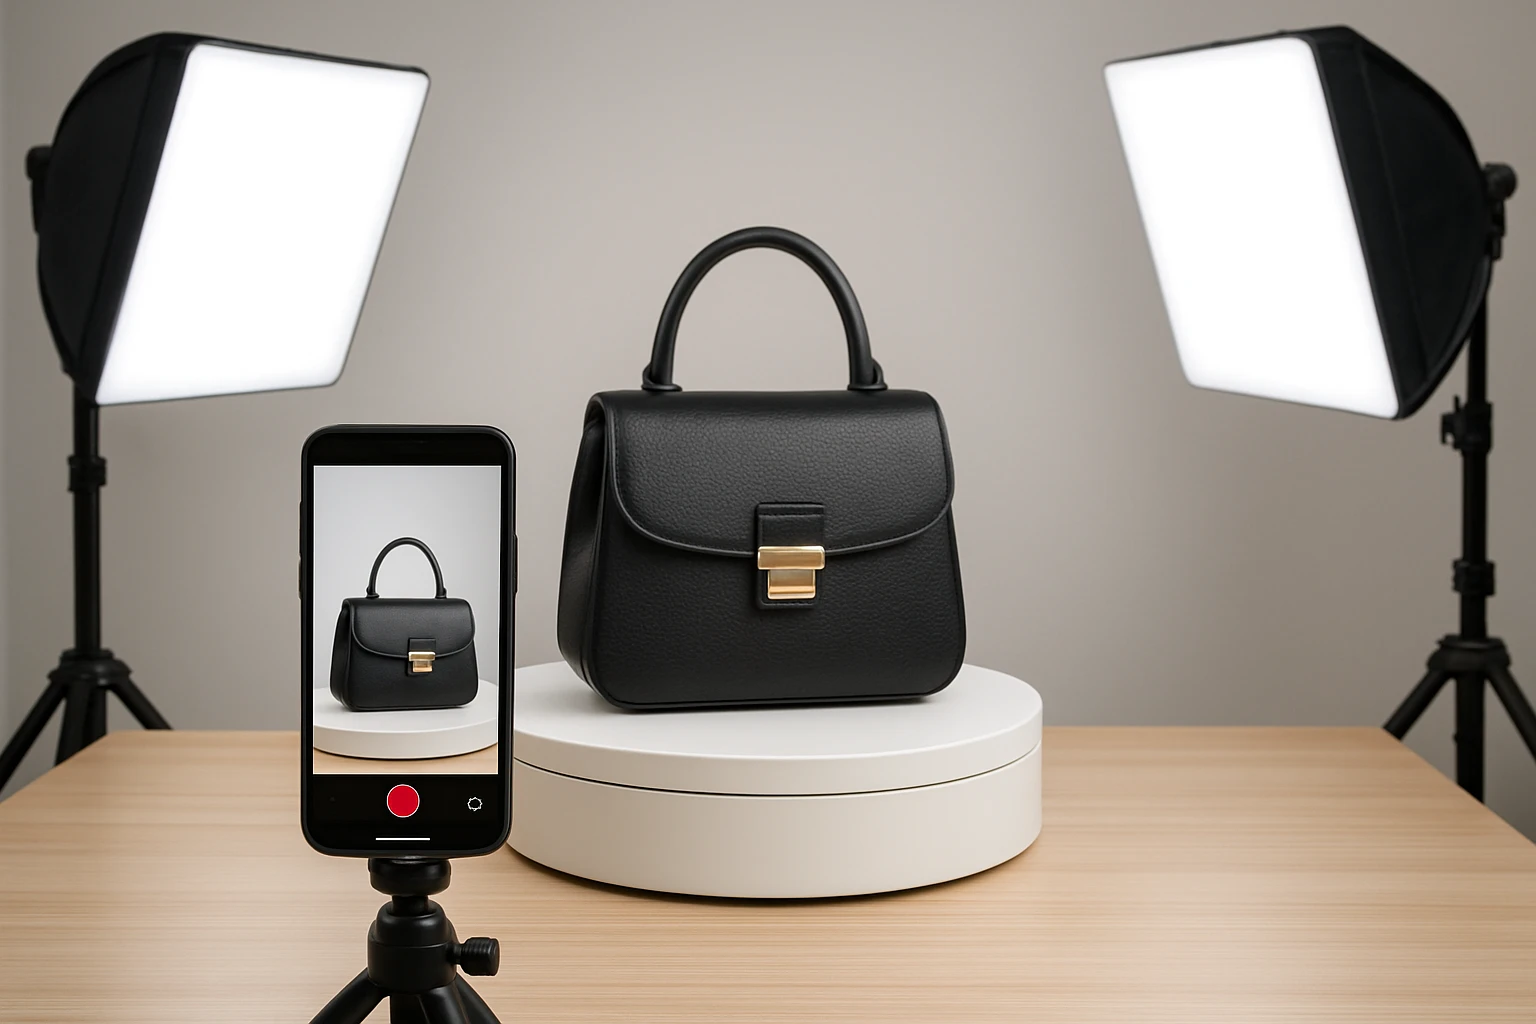
What You’ll Need
- Motorized rotating platform – JAYEGT Motorized Display Stand
- Softbox lighting kit – Torjim Softbox Lighting Kit
- Bi‑color LED light kit – NEEWER 660 LED Light Kit
- Smartphone with manual camera controls (iOS or Android)
- Tripod or stable mount for the smartphone
- Neutral background (white paper or fabric)
- Optional: external battery for extended shooting
Step 1: Set Up the Motorized Display Stand
Begin by unpacking the JAYEGT Motorized Display Stand. Place the turntable on a level surface and connect the power adapter (110‑220 V to DC 15 V). Use the remote control to select the desired rotation mode; for product spins, the continuous clockwise mode at 60 seconds per revolution provides a smooth visual flow. The platform supports up to 350 lb (158 kg) load, making it suitable for heavy items such as clothing mannequins or small furniture pieces. Adjust the speed using the remote until the rotation matches the frame rate of your smartphone camera, typically 30 fps.
The stand includes a position‑memory function that returns the platform to a predefined start point after each recording session. This feature eliminates the need for manual alignment and ensures consistent framing across multiple takes. If the product is lightweight, you may consider a smaller turntable, but the JAYEGT model offers the flexibility to accommodate a wide range of items without compromising stability. Secure the product to the center of the platform using non‑slip pads or double‑sided tape to prevent wobble during rotation.
Step 2: Arrange Lighting for Even Illumination
Proper lighting is essential for revealing product details and minimizing shadows. Position the Torjim Softbox Lighting Kit on either side of the turntable at a 45° angle to the product. The softbox’s PET fabric and reflective interior produce diffused light that reduces harsh edges, while the 85 W LED bulbs operate between 3000‑7500 K, allowing you to match daylight or warmer studio tones.
Set both softboxes to the same color temperature to maintain color consistency throughout the spin. The remote‑controlled dimming feature lets you fine‑tune brightness without disturbing the setup. For larger products, supplement the softboxes with the NEEWER 660 LED Light Kit. Mount each LED panel on its own light stand, position them opposite the softboxes, and use the barndoors to shape the light spill. The bi‑color LEDs offer 3200‑5600 K adjustable temperature and 0‑100 % brightness, providing additional control over highlights and reflections.
Ensure that the background remains evenly lit; any variation will appear as flickering in the final video. Use the softboxes to illuminate the backdrop from behind the product, creating a seamless separation between the item and the background. This lighting arrangement mimics professional studio conditions while remaining affordable and portable.
Step 3: Configure Your Smartphone Camera
Mount the smartphone on a tripod directly in front of the turntable, centered on the product’s axis. Set the camera to manual mode, disabling auto‑focus and auto‑exposure to maintain consistent settings throughout the recording. Select a resolution of at least 1080p at 30 fps; higher resolutions such as 4K provide more detail but require greater storage space.
Adjust the ISO to a low value (100‑200) to reduce noise, and set the shutter speed to double the frame rate (approximately 1/60 s) for smooth motion blur. Use a fixed white balance that matches the lighting temperature you selected in Step 2, for example 5600 K for daylight‑balanced softboxes. Lock the focus on the product’s central point, then verify that the entire object remains within the frame as the turntable rotates.
If your smartphone supports RAW capture, enable it to retain maximum dynamic range for post‑processing. Record a short test clip of a few seconds, then review it to confirm that the rotation appears fluid and that lighting remains even across the full 360°. Adjust any parameters as needed before proceeding to the full capture.
Step 4: Capture the Full 360° Rotation
Start the turntable in continuous mode, then immediately begin recording on the smartphone. Allow the platform to complete at least one full revolution; a single 60‑second rotation yields 1800 frames at 30 fps, which is sufficient for smooth playback. If you require a slower spin for dramatic effect, increase the rotation period on the turntable remote to 90 or 120 seconds and adjust the camera’s frame rate accordingly.
During recording, monitor the smartphone screen to ensure that the product stays centered and that no unintended shadows appear. If the remote control offers a position‑memory function, use it to return the platform to the exact starting angle after each take, enabling seamless stitching of multiple clips if you wish to create a longer loop.
When the rotation completes, stop the recording and power off the turntable. Transfer the video file to a computer for editing. Because the lighting and camera settings were locked, the footage will exhibit consistent color and exposure, reducing the need for extensive color correction.
Step 5: Post‑Process and Export the Spin Video
Import the video into a basic editing program such as iMovie, DaVinci Resolve, or Adobe Premiere Rush. Trim any excess footage at the beginning or end to ensure that the clip starts and ends at the same rotational point, creating a seamless loop. If desired, add a subtle fade‑in and fade‑out to mask any minor discontinuities.
Apply a light color‑grade using the RAW data (if captured) to enhance product details without oversaturating. Export the final video in MP4 format with H.264 encoding, selecting a bitrate of 10‑15 Mbps for high‑quality streaming. For e‑commerce platforms that support 360° interactive views, consider converting the video into a series of still frames and uploading them to a specialized viewer.
Finally, test the video on the target platform to verify playback smoothness and loading speed. Optimize the file size if necessary by reducing resolution or bitrate while preserving visual fidelity.
Tips & Pro Tips
- Use a matte white or light‑gray background to avoid color cast and to highlight product contours.
- Place a small piece of foam or rubber under the turntable to dampen vibrations from foot traffic.
- If the product has reflective surfaces, position a polarizing filter on the smartphone lens to minimize glare.
- For very small items, consider a macro lens attachment to maintain sharp focus at close distances.
- Record in a quiet environment; ambient noise can be distracting when the video is used with background music.
Troubleshooting
- Uneven rotation speed: Verify that the remote control is set to a constant speed mode rather than intermittent or angle‑step mode.
- Shadows appearing during rotation: Add a second softbox or reposition existing lights to fill in dark zones caused by the product’s geometry.
- Blurry footage: Increase the shutter speed to 1/120 s and ensure the smartphone’s focus is locked on the product.
- Audio hiss in the video: Mute the smartphone’s microphone during recording or replace the audio track in post‑production.
Conclusion
By following this step‑by‑step guide, one can create professional‑grade 360° product spin videos using a smartphone, a motorized display stand, and versatile lighting kits. The combination of the JAYEGT Motorized Display Stand, Torjim Softbox Lighting Kit, and NEEWER 660 LED Light Kit provides a reliable, repeatable workflow for showcasing products online. Consistent lighting, stable rotation, and locked camera settings ensure that each spin highlights product details and engages viewers. Implement these practices to enhance your e‑commerce listings, social media content, and promotional videos.
Products Mentioned in This Guide


Frequently Asked Questions
What equipment do I need to create a 360° product spin with my smartphone?
You need a motorized rotating platform, softbox lighting, a bi‑color LED light kit, and a smartphone with manual camera controls.
How should I set up the lighting for a smooth 360° product video?
Place softbox lights on either side to eliminate shadows and use a bi‑color LED to fine‑tune color temperature for consistent illumination.
What camera settings on my smartphone give the best results?
Use manual mode, set a low ISO (100‑200), a fixed shutter speed (1/60 s), and lock focus on the product to avoid flicker.
How fast should the rotating platform spin for a seamless video?
Aim for 1‑2 rotations per second (30‑60 rpm); slower speeds make editing easier and produce smoother motion.
What is the simplest way to edit and export the 360° spin for e‑commerce platforms?
Trim the clips, add a loopable fade, and export as MP4 (H.264) at 1080p, which is widely supported by online stores.