How to Use a Waterproof Smartphone Gimbal: Essential Lighting Tips for Stunning Underwater and Low‑Light Shots
Introduction
In this guide one will discover how to combine a smartphone gimbal with waterproof protection and strategic lighting to produce professional‑grade underwater and dim‑environment videos. The techniques described are valuable for content creators, travel vloggers, and anyone who wishes to document marine life or night‑time events without costly camera rigs. By following the step‑by‑step instructions one can achieve smooth, well‑exposed footage while preserving the compact convenience of a smartphone.
The article emphasizes practical actions, explains why each recommended tool is advantageous, and offers troubleshooting tips to avoid common pitfalls. Whether one already owns a gimbal or is considering a purchase, the information remains useful.
What You’ll Need
- Smartphone compatible with the chosen gimbal (iOS or Android).
- Waterproof housing or case that fits the phone and allows access to the camera lens.
- One of the recommended gimbals: DJI Osmo Mobile 6, Hohem iSteady M7, DJI Osmo Mobile 7, or DJI Osmo Mobile 7P.
- LED lighting accessory (compact waterproof LED panel or clip‑on light).
- Portable power bank for extended shoots.
- DJI Mimo app installed on the smartphone.
Step 1: Choose a Waterproof‑Ready Gimbal
Selecting a gimbal that can be paired with a waterproof case is the foundation of a successful underwater shoot. The DJI Osmo Mobile 6 offers a lightweight, fold‑able design that weighs only 305 g and includes a built‑in extension rod for creative angles. Its 3‑axis stabilization and ActiveTrack 6.0 technology keep subjects steady even when the user moves through water. With a rating of 4.5 / 5 from over 20,000 reviewers, it provides reliable performance at a price of $119.00.
For users who require longer battery life and advanced tracking, the Hohem iSteady M7 delivers 12 hours of operation and a detachable 1.4‑inch touchscreen remote. Its magnetic AI tracker ensures precise subject lock, which is useful when filming moving marine life. Although priced higher at $269.00, its 4.2 / 5 rating reflects strong satisfaction among professional videographers.
If budget constraints are a concern, the DJI Osmo Mobile 7 provides a solid entry point at $50.15 with a 4.5 / 5 rating. It includes a built‑in tripod and ActiveTrack 7.0, making it suitable for quick deployment in shallow water.
Finally, the DJI Osmo Mobile 7P integrates a multifunctional module that adds native lighting and audio capabilities, an excellent choice for low‑light environments. At $99.00 and a 4.6 / 5 rating, it balances cost and functionality.
Step 2: Prepare the Waterproof Housing
Before attaching the phone to the gimbal, place it inside a waterproof case that matches the device dimensions. Ensure that the case’s lens opening aligns precisely with the smartphone camera to avoid distortion. Verify the seal by submerging the case in water for a few seconds; no bubbles should appear inside.
Many manufacturers provide case specifications that indicate a depth rating of up to 30 meters. Selecting a case with a clear polycarbonate front preserves color fidelity, which is critical for underwater footage where light absorption alters hues.
After sealing the phone, power it on and launch the DJI Mimo app. The app will recognize the gimbal once it is attached, allowing you to calibrate the device while the phone remains protected.
Keep a small towel nearby to dry the exterior of the case before mounting the gimbal to prevent slipping.
Step 3: Balance and Mount the Gimbal
Proper balancing reduces motor strain and extends battery life. Place the waterproof‑cased phone on the gimbal’s clamp, ensuring that the device sits horizontally. Adjust the tilt and roll axes until the phone remains level when the gimbal is powered off.
For the Osmo Mobile 6, the magnetic phone clamp simplifies this process; the phone snaps into place and the gimbal automatically powers on when unfolded. The iSteady M7 features a detachable touchscreen remote that can be positioned on a nearby surface, allowing fine‑tuning without removing the phone from the water.
Once balanced, engage the gimbal’s self‑leveling function. This step ensures that the stabilization algorithm has a neutral starting point, which is essential for smooth motion underwater where currents can cause subtle shifts.
Secure any loose cables or accessories to prevent entanglement with the gimbal’s moving parts.
Step 4: Configure Camera Settings for Low Light
Open the camera interface within the DJI Mimo app and select manual exposure mode. Increase the ISO to 800–1600 depending on ambient light, but avoid values above 3200 to prevent excessive noise. Set the shutter speed to a minimum of 1/30 second to capture sufficient light while maintaining motion smoothness.Adjust the white balance to “underwater” or “tungsten” if shooting in artificial light. The app’s histogram feature helps verify that highlights are not clipping, which is a common issue in bright surface reflections.
Enable the “Timelapse” mode for capturing marine life over extended periods; the gimbal will maintain stability while the camera records at set intervals.
Save these settings as a custom preset in the app so that you can quickly switch between underwater and surface shooting without reconfiguring each time.
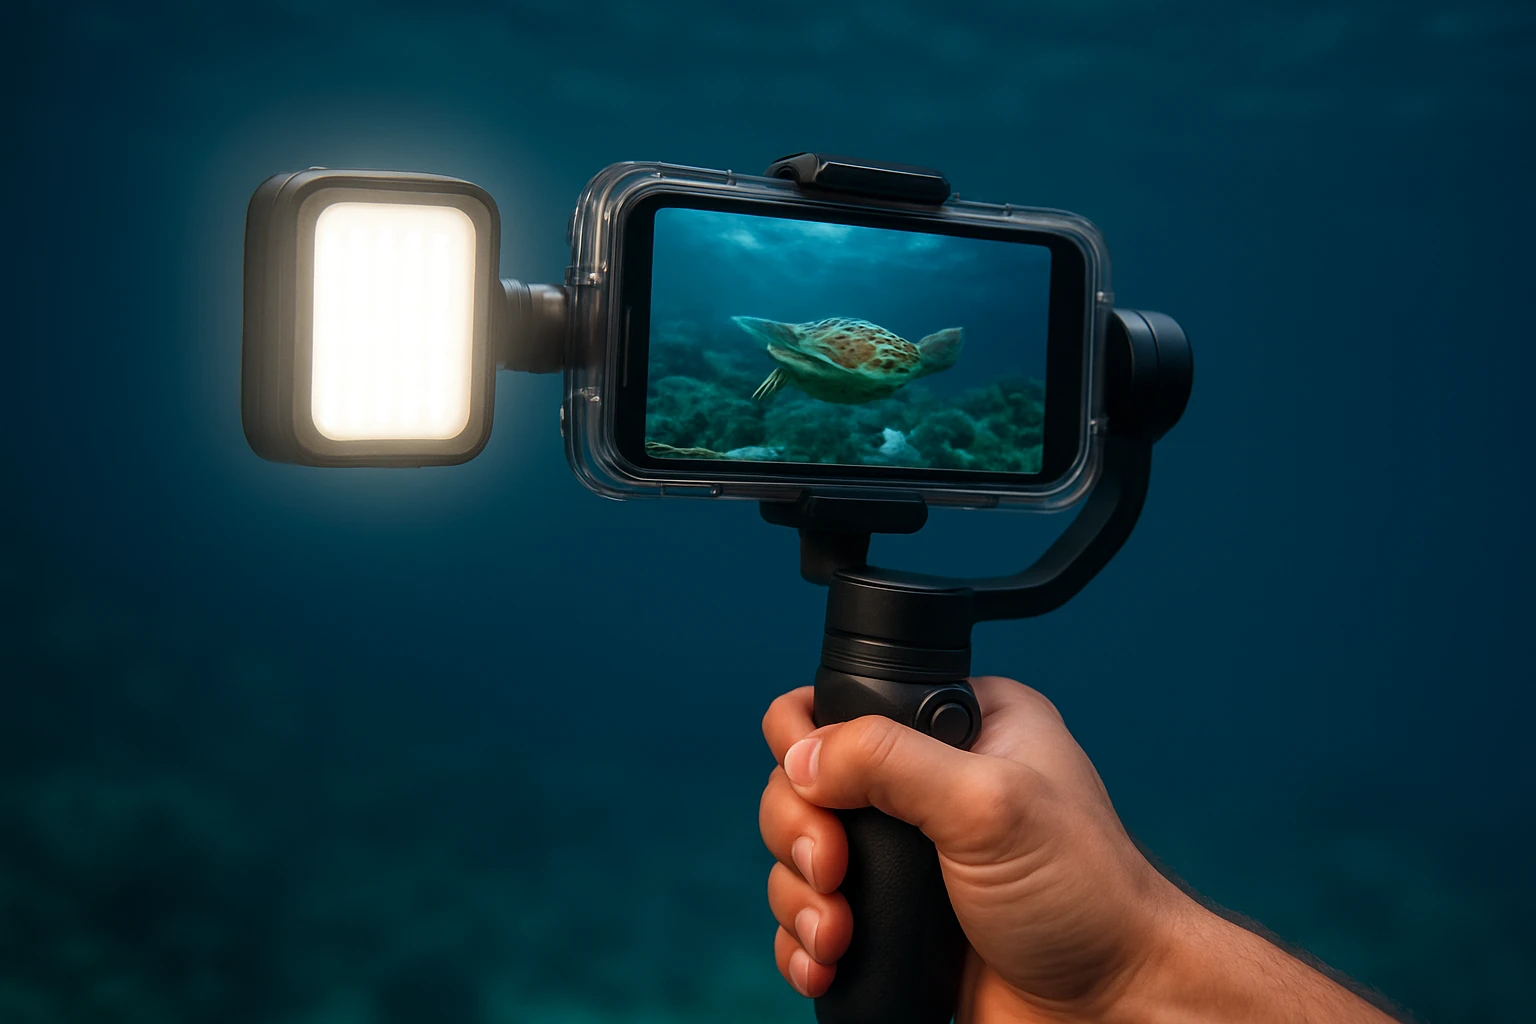
Step 5: Add Supplemental Lighting
Even in clear water, light diminishes quickly with depth. Attaching a compact waterproof LED panel to the gimbal’s built‑in extension rod provides consistent illumination without sacrificing mobility. The Osmo Mobile 7P includes a multifunctional module that offers integrated lighting, making it an ideal all‑in‑one solution for low‑light environments.
If using the Osmo Mobile 6, pair it with an external LED that mounts via a cold‑shoe adapter. Choose a light with adjustable brightness and a color temperature range of 3200–5600 K to match natural water tones.
Position the light at a 45‑degree angle to the subject to reduce backscatter, which appears as hazy specks when light reflects off suspended particles. Use the gimbal’s extension rod to distance the light source from the camera lens, thereby improving image clarity.
Monitor battery consumption; high‑output LEDs can drain the gimbal’s power quickly. A portable power bank connected to the LED via a USB‑C cable ensures uninterrupted lighting for longer dives.
Step 6: Capture the Shot
With the gimbal balanced, lighting in place, and camera settings optimized, begin recording. Activate ActiveTrack 6.0 (or 7.0 depending on the model) to lock onto moving subjects such as fish or divers. The tracking algorithm compensates for both the user’s movement and the subject’s motion, delivering buttery‑smooth footage.
Use the built‑in extension rod to achieve unique perspectives: extend the rod to capture wide‑angle selfies or to position the camera above a coral formation while keeping the gimbal stable. The rod’s lightweight aluminum construction adds minimal drag in the water.
When filming in very low light, switch to the “One‑Tap Edit” feature after recording. The app automatically enhances exposure and reduces noise, allowing you to produce polished clips without external software.
Remember to keep movements slow and deliberate; rapid motions can cause water resistance that destabilizes the gimbal, especially at greater depths.
Tips & Pro Tips
- Pre‑dive checklist: Verify that the waterproof case is sealed, the gimbal battery is fully charged, and the LED light is set to the desired brightness.
- Use a neutral‑density (ND) filter: Some waterproof housings allow an ND filter to be attached, which helps control exposure in bright surface conditions.
- Maintain a low center of gravity: Keep the gimbal close to the body to reduce torque caused by water currents.
- Post‑process with color correction: Underwater footage often benefits from a slight increase in red channel saturation to counteract the blue‑green cast.
- Safety first: Do not dive deeper than the rating of your waterproof case, and always keep an eye on the gimbal’s battery indicator.
Troubleshooting
Problem: Gimbal motor hums loudly underwater.
Solution: Re‑balance the phone and ensure the case is centered. Excess weight on one side forces the motors to work harder, producing audible noise.
Problem: Video appears blurry despite high ISO.
Solution: Increase LED brightness or add a second light source. Additionally, verify that the focus lock is engaged in the camera app.
Problem: ActiveTrack loses the subject.
Solution: Ensure sufficient contrast between the subject and background. Use the iSteady M7’s magnetic AI tracker for improved precision in low‑contrast scenarios.
Conclusion
By following the steps outlined above one can transform a simple smartphone into a powerful tool for capturing underwater and low‑light footage. The combination of a reliable gimbal, proper waterproof protection, and strategic lighting yields smooth, well‑exposed videos that rival dedicated action cameras. Continued practice with the stabilization and tracking features will further refine one’s technique, enabling the creation of compelling visual stories in any aquatic environment.
Products Mentioned in This Guide
Frequently Asked Questions
What type of waterproof housing is needed for a smartphone gimbal?
Use a sealed case that fits your phone’s dimensions, has a clear lens window, and includes a locking mechanism to prevent leaks.
Can I use any LED light with a waterproof gimbal?
Choose a small, battery‑powered LED that mounts to the gimbal’s accessory port and is rated for water resistance.
How do I balance a smartphone on a waterproof gimbal before diving?
Place the phone in the housing, attach it to the gimbal, and adjust the tilt and roll until the gimbal stays level without motor assistance.
What are common lighting mistakes underwater and how to avoid them?
Avoid harsh, direct beams that cause backscatter; use diffused, angled lighting and keep the light close to the subject.
What should I do if my footage appears grainy in low‑light conditions?
Increase the LED brightness, lower the smartphone’s ISO, and enable the gimbal’s stabilization to allow longer exposure without blur.