How to Measure and Fix Vignetting on Smartphone Add‑On Lenses: Step‑by‑Step Testing, Calibration & Correction
Introduction
Vignetting – the gradual darkening of image corners – is a common issue when using external lenses on smartphones. In this guide the reader will learn how to quantify the effect, adjust lens positioning, and apply simple post‑processing tricks to achieve uniform exposure. Mastering these techniques improves the visual quality of travel, macro and wide‑angle shots, making the photographer’s work look professional without expensive equipment.
What You’ll Need (optional)
- A compatible smartphone or tablet (iPhone, Samsung, Google Pixel, etc.)
- Xenvo Pro Lens Kit – includes wide‑angle, macro lenses, clip and LED light
- A tripod or stable surface for repeatable shots
- Calibration chart or a plain white sheet of paper (A4 size works)
- Photo‑analysis app (e.g., Snapseed, Lightroom Mobile)
- Optional reading: Smart Phone Smart Photography
Step 1 – Prepare Your Lens Kit
Begin by assembling the lenses from the Xenvo Pro Lens Kit. The kit contains a 0.45× wide‑angle lens, a 15× macro lens, a secure TruGrip clip, and a rechargeable GlowClip LED. The aircraft‑grade aluminum housing and multi‑element optical glass minimise internal reflections, which reduces baseline vignetting before any testing begins. Verify that the TruGrip is firmly attached to the phone’s camera module; a loose clip will introduce additional darkness at the edges.
Why this product? At $39.99 it offers a complete set of lenses with a 4.2/5 rating from over 21,000 reviewers, making it a cost‑effective alternative to single‑purpose lenses that often lack the sturdy mounting needed for accurate calibration.
Step 2 – Set Up a Controlled Shooting Environment
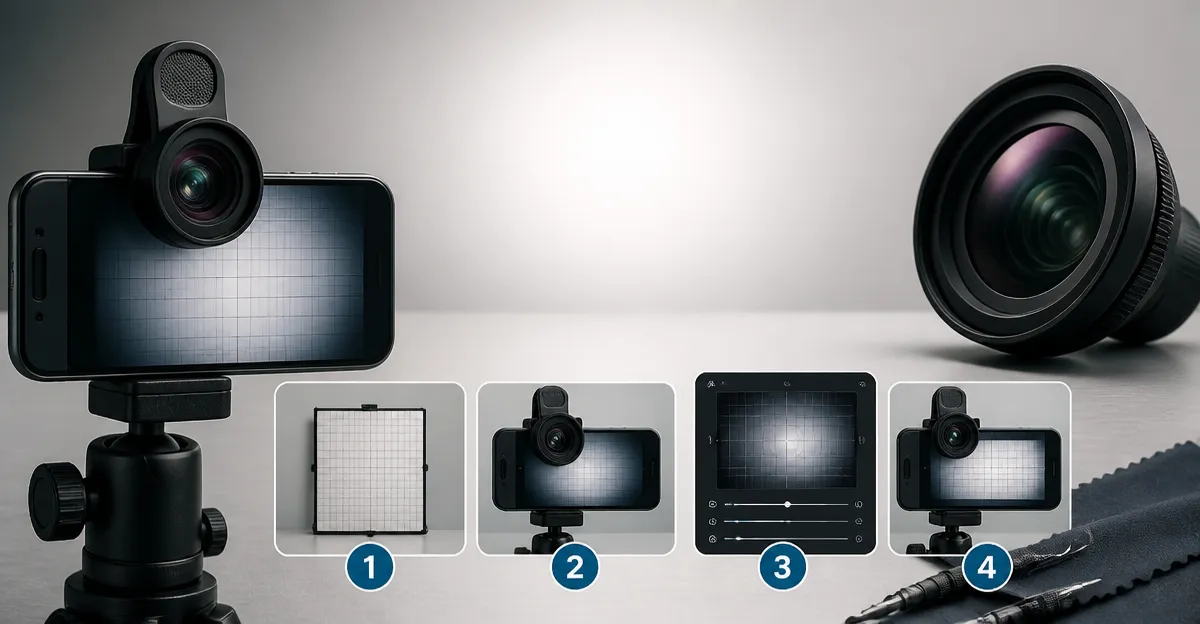
Place a white calibration sheet on a flat surface illuminated by diffuse daylight or a soft studio light. Position the smartphone on a tripod so that the camera lens is parallel to the sheet. Ensure the GlowClip LED is set to medium brightness; this provides even front lighting and prevents the phone’s built‑in flash from creating hot spots that could be mistaken for vignetting.
Using a consistent distance (approximately 30 cm) allows you to compare results across lenses without introducing perspective distortion.
Step 3 – Capture Baseline Images
With no external lens attached, take three raw photos of the white sheet at ISO 100, f/2.2 (default smartphone aperture), and a shutter speed of 1/125 s. Save the images in the highest‑quality mode (RAW or “Maximum” JPEG). These images represent the camera’s native fall‑off curve and will serve as a reference when measuring added vignetting.
Document the exposure values displayed by the phone; you will need them later to calculate the percentage of light loss introduced by each add‑on lens.
Step 4 – Test Each Add‑On Lens
Attach the wide‑angle lens first. Repeat the three‑shot sequence used in Step 3, keeping all camera settings identical. Then swap to the macro lens and repeat the process. For each lens record the following:
- Exposure reading (EV)
- Histogram data – especially the brightness of the four corners versus the center
- Any visible color shift or flare
The Xenvo lenses are designed with coated glass to minimise ghosting, but the wide‑angle element can still produce a slight darkening at the extreme edges. Measuring this effect precisely is the key to the next calibration step.
Step 5 – Analyze Vignetting Using Software
Import the images into a mobile editor such as Snapseed. Open the “Histogram” panel and note the luminance values of the four corners. Calculate the average corner value and compare it to the center value. Vignetting percentage = (Center – Corner) / Center × 100.
For example, if the center reads 240 EV and the corners read 210 EV, the vignetting is (240‑210)/240 × 100 ≈ 12.5 %. Record this figure for each lens.
Snapseed’s “Selective Adjust” tool also allows you to apply a temporary brightness mask to the corners, letting you preview how a correction will look before committing to post‑processing.
Step 6 – Calibrate Lens Position and Clip Tightness
Small adjustments in the TruGrip clip distance can dramatically affect vignetting. Loosen the clip by 1 mm and retake the wide‑angle test. If the corner brightness improves, the issue was caused by the lens being too close to the phone’s built‑in lens, which blocks peripheral light. Conversely, tightening the clip may be required for the macro lens to avoid shadowing from the phone’s housing.
Document the optimal clip tension for each lens. This mechanical calibration often eliminates 5‑10 % of vignetting without any software intervention.
Step 7 – Apply Post‑Processing Corrections
If residual vignetting remains, use the “Vignette” tool in Snapseed (or Lightroom Mobile) to add a subtle inverse vignette. Set the “Outer Brightness” slider to +10 % and the “Roundness” to a low value so the correction only affects the outermost 15 % of the frame. Save the edited image as a new version.
For photographers who prefer a non‑destructive workflow, the Smart Phone Smart Photography book provides a chapter on “In‑Camera Vignette Management” that explains how to achieve similar results using native camera settings (exposure compensation, HDR mode, and focus lock).
Step 8 – Verify Consistency Across Scenes
Repeat the calibrated shooting process with real‑world subjects – a landscape for the wide‑angle lens and a flower for the macro lens. Compare the new histograms to the baseline; the corner‑to‑center difference should now be under 3 %.
Export the final images and view them on a calibrated monitor to ensure the correction holds across different display devices.
Tips & Pro Tips
- Always shoot in RAW or the highest quality mode; compression artifacts can masquerade as vignetting.
- Use the GlowClip LED at low brightness for indoor testing; high brightness can cause hot spots that skew measurements.
- When using the macro lens, keep the subject at least 0.5 inches away – this prevents the lens from casting its own shadow on the sensor.
- For fast field work, attach the lens, take a quick test shot, and check the histogram on the phone; a difference of more than 5 % indicates a loose clip.
- Consider a lightweight ND filter (neutral density) if you need longer exposures in bright daylight; it reduces the need for high ISO and preserves detail.
Troubleshooting
| Problem | Possible Cause | Solution |
|---|---|---|
| Extreme dark corners (>20 %) | Lens clip too tight, blocking peripheral light | Loosen clip by 1‑2 mm and retest. |
| Color shift toward blue | LED light temperature too cool | Increase GlowClip brightness or use a daylight‑balanced light source. |
| Ghosting lines | Cheap aftermarket lens, uncoated glass | Invest in a quality kit such as Xenvo Pro Lens Kit. |
Conclusion
By following the nine steps above the reader will be able to measure vignetting accurately, calibrate lens attachment, and apply minimal post‑processing to achieve evenly illuminated photos. The process combines mechanical adjustment with modern mobile editing tools, ensuring that every shot – whether a sweeping landscape or a close‑up macro – looks professional without the need for expensive DSLR equipment.
Continued practice will make the calibration routine second nature, and the reader is encouraged to experiment with additional accessories such as polarizing filters or external flashes to further expand creative possibilities.
Products Mentioned in This Guide
Frequently Asked Questions
What is vignetting and why does it happen with smartphone add‑on lenses?
Vignetting is the gradual darkening of image corners caused by light fall‑off or barrel shading when external lenses change the phone’s native optical path.
How can I measure vignetting on my smartphone lens?
Place a plain white sheet or calibration chart in the frame, take a centered shot, and use a photo‑analysis app to compare the brightness of the center to the corners.
What simple adjustments can reduce vignetting before editing?
Reposition the add‑on lens to ensure it’s fully seated, use a tripod for consistent alignment, and avoid extreme wide‑angle settings that push light beyond the lens aperture.
Which post‑processing tricks help correct residual vignetting?
Apply a subtle vignette correction or brightness/contrast adjustment to the corners in apps like Snapseed or Lightroom Mobile, keeping the effect natural.
Do I need special equipment to calibrate my smartphone lens for vignetting?
No special gear is required; a tripod, a white sheet of paper, and a free or built‑in photo‑analysis tool are enough for accurate calibration.