How to Do Smartphone Macro Focus Stacking: Step-by-Step Tutorial for Stunning Close-Ups
Introduction
Macro photography reveals the hidden world that lies within a few centimeters of the eye. Focus stacking combines several images taken at slightly different focus distances to produce a final photograph with extended depth of field. This guide explains the complete workflow, from equipment preparation to final image blending, and demonstrates why the technique adds value to scientific observation, product documentation, and artistic expression. Readers will learn how to achieve professional‑level results using a smartphone, inexpensive accessories, and free software.
What You'll Need
- Smartphone with a high‑resolution camera (iOS or Android).
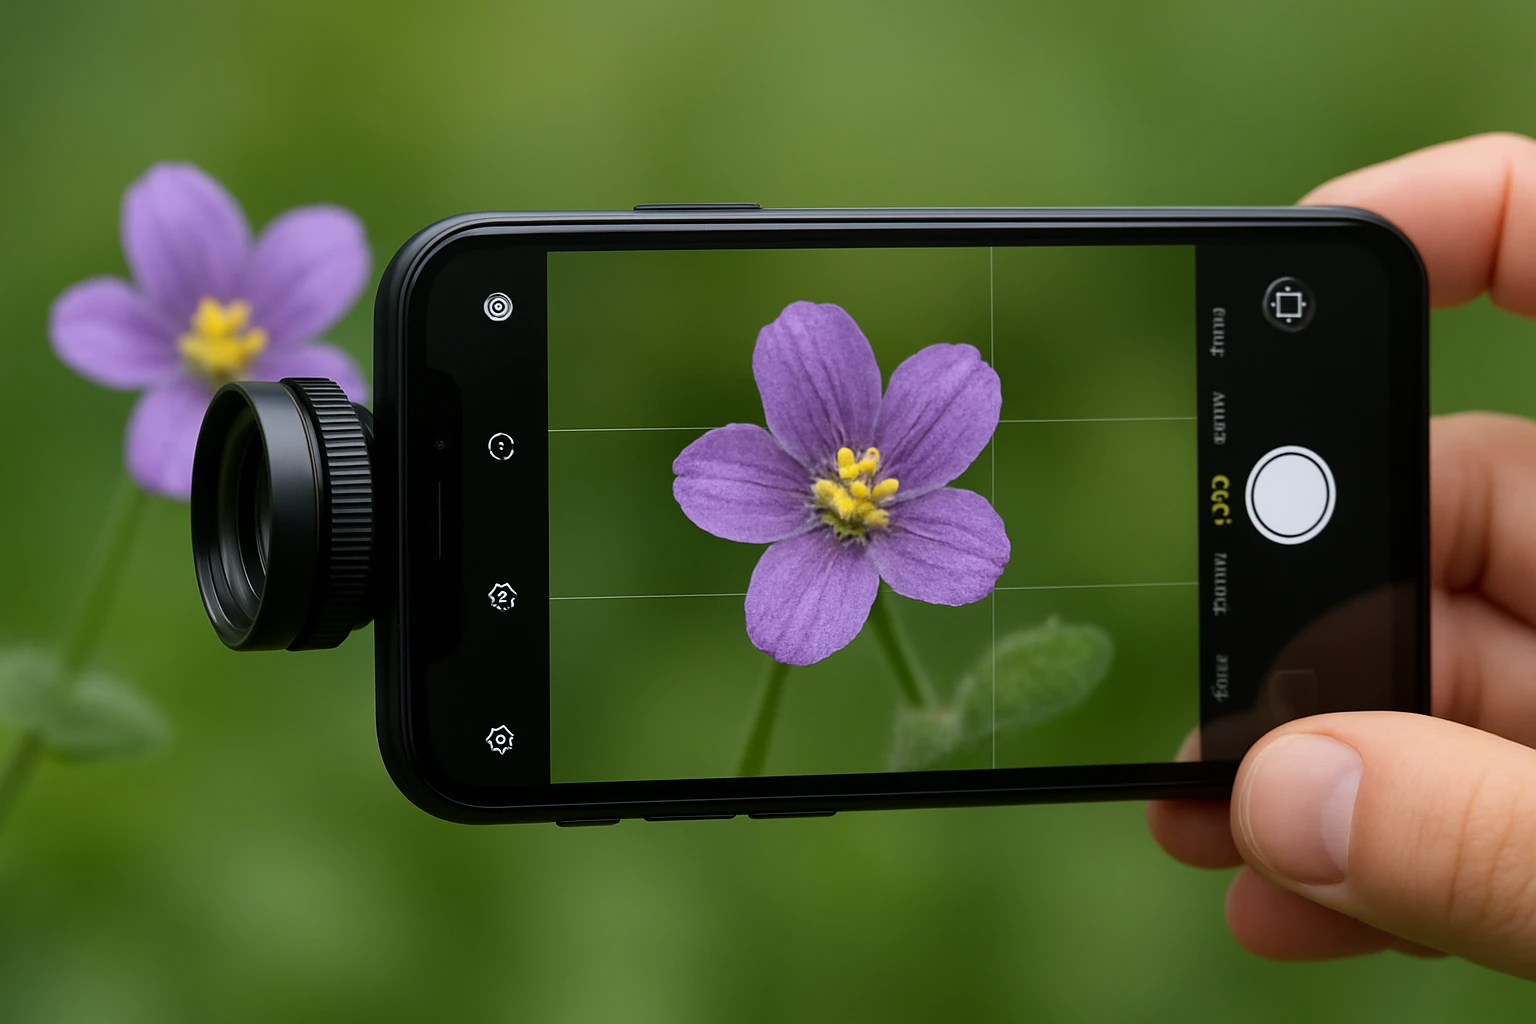
- APEXEL Macro Lens – 12X/24X detachable macro attachment with universal clip.
- Mini tripod or stable surface to minimise camera shake.
- Remote shutter release or timer function to avoid touching the phone during exposure.
- Lighting source such as a LED ring light or daylight diffuser.
- Focus‑stacking software (e.g., Adobe Photoshop, Helicon Focus, or free mobile apps).
Step 1: Prepare Your Workspace
Choose a well‑lit area where ambient light is consistent. Natural light from a window provides soft illumination, but a LED ring light ensures even lighting for subjects such as insects or textured surfaces. Position the mini tripod on a stable table and adjust its height so that the smartphone camera aligns with the subject at the desired distance. Ensure that the background is non‑reflective to avoid stray highlights that could complicate later blending.
Step 2: Attach the Macro Lens
Secure the APEXEL Macro Lens to the phone using the universal clip. The clip fits over the primary camera without requiring a specific case, allowing rapid installation on any device. Select the 12X element for general subjects and switch to the 24X element when extreme magnification is needed. The lens features multi‑layer coating that increases transmissivity and reduces reflectivity, resulting in clearer images. Price is $25.99 and the product holds a rating of 3.9 out of 5 stars based on 784 reviews, indicating reliable performance for its price point.
Step 3: Set Camera Parameters
Open the native camera application and switch to manual or pro mode if available. Disable any automatic focus assistance and set the ISO to the lowest native value to minimise noise. Choose a moderate shutter speed that balances exposure with the need to avoid motion blur; a speed of 1/125 s is often sufficient when the phone is mounted on a tripod. Activate the timer (2‑second delay) or connect a Bluetooth remote shutter release to eliminate physical contact during exposure.
Step 4: Determine Focus Increment
Because macro lenses have an extremely shallow depth of field, the focus plane moves only a few millimetres between shots. Use the phone's focus peaking feature, if available, to visualise the sharpest area. Manually adjust the focus ring on the macro lens (or use the phone's focus slider) in increments of approximately 0.2 mm. Capture a series of 8‑12 images, each slightly deeper than the previous, until the entire subject appears in focus across the stack.
Step 5: Capture the Image Series
Begin with the nearest focal point and press the shutter for each incremental adjustment. Keep the lighting constant throughout the sequence; any change in illumination will cause mismatched exposure levels that complicate blending. Review the images on the phone screen to confirm that each frame adds new detail to the previously captured area. If a frame appears blurry, repeat the shot at that focus distance.
Step 6: Transfer Images to a Computer
After completing the capture, copy the image series to a computer via USB cable, cloud sync, or wireless transfer. Organise the files in a dedicated folder named after the subject for easy reference. Rename the files sequentially (e.g., macro_01.jpg, macro_02.jpg) to ensure the stacking software recognises the correct order.
Step 7: Perform Focus Stacking
Open the chosen focus‑stacking application. In Adobe Photoshop, load the images as layers, select Auto‑Align Layers, and then choose Stack Mode > Median or Maximum to combine the sharpest pixels from each layer. In dedicated software such as Helicon Focus, import the image set, let the program analyse focus maps, and click Render. Adjust the output settings to retain the original resolution and save the final image in a lossless format (e.g., PNG or TIFF).
Step 8: Post‑Processing and Sharpening
Apply subtle contrast enhancement and colour correction to bring out the natural tones of the subject. Use a non‑destructive adjustment layer for exposure and vibrance. Finally, apply a modest amount of sharpening (e.g., Unsharp Mask with radius 0.8 px, amount 150 %) to accentuate fine details without introducing artefacts. Export the finished photograph for sharing or printing.
Tips & Pro Tips
- Maintain a constant working distance of about 0.3 inch when using the APEXEL Macro Lens. This distance is optimal for both 12X and 24X magnifications.
- Use a small piece of foam or a rubber mat under the tripod to dampen vibrations on hard surfaces.
- If the subject is a living insect, consider a gentle cooling method (e.g., placing the specimen in a refrigerator for a few minutes) to reduce movement during capture.
- When lighting is insufficient, add a diffuser to soften harsh shadows caused by the LED ring light.
- For maximum depth, overlap focus zones by 30 % to ensure seamless blending.
Troubleshooting
| Problem | Possible Cause | Solution |
|---|---|---|
| Vignetting at image edges | Lens barrel covering part of the sensor | Re‑position the macro lens slightly farther from the camera housing; use the 12X element if 24X produces excessive darkening. |
| Blurred frames despite tripod | Insufficient shutter speed or subject motion | Increase shutter speed, use the timer, or apply a remote release to avoid touching the phone. |
| Uneven exposure across stack | Variable ambient light | Block external light sources and rely on a constant LED source for all frames. |
Conclusion
Smartphone macro focus stacking transforms ordinary mobile cameras into powerful tools for scientific observation and artistic exploration. By following the systematic steps outlined above, users can produce images with extended depth of field, vivid colour, and extraordinary detail. The affordable APEXEL Macro Lens serves as an essential accessory that bridges the gap between casual shooting and professional macro work. Readers are encouraged to experiment with different subjects, lighting setups, and software options to refine their technique and expand their visual portfolio.
Products Mentioned in This Guide
Frequently Asked Questions
What is smartphone macro focus stacking and why use it?
It combines multiple close‑up shots taken at different focus distances to create a single image with greater depth of field, giving sharper, more detailed macro photos.
Which accessories are essential for macro focus stacking on a smartphone?
A detachable macro lens (e.g., APEXEL 12X/24X), a mini tripod or stable surface, a remote shutter or timer, and consistent lighting such as a LED ring light.
How do I prevent camera shake when shooting macro focus stacks?
Mount the phone on a tripod or stable platform and use a remote shutter release or timer to avoid touching the device during exposure.
What software can I use to blend focus‑stacked images for free?
Free programs like Adobe Photoshop Express, GIMP, or dedicated apps such as Focus Stacker let you align and merge the series into a single high‑depth‑of‑field image.
Can I achieve professional results with an Android phone?
Yes, as long as the phone has a high‑resolution sensor and you use a quality macro lens, stable support, proper lighting, and post‑processing software.