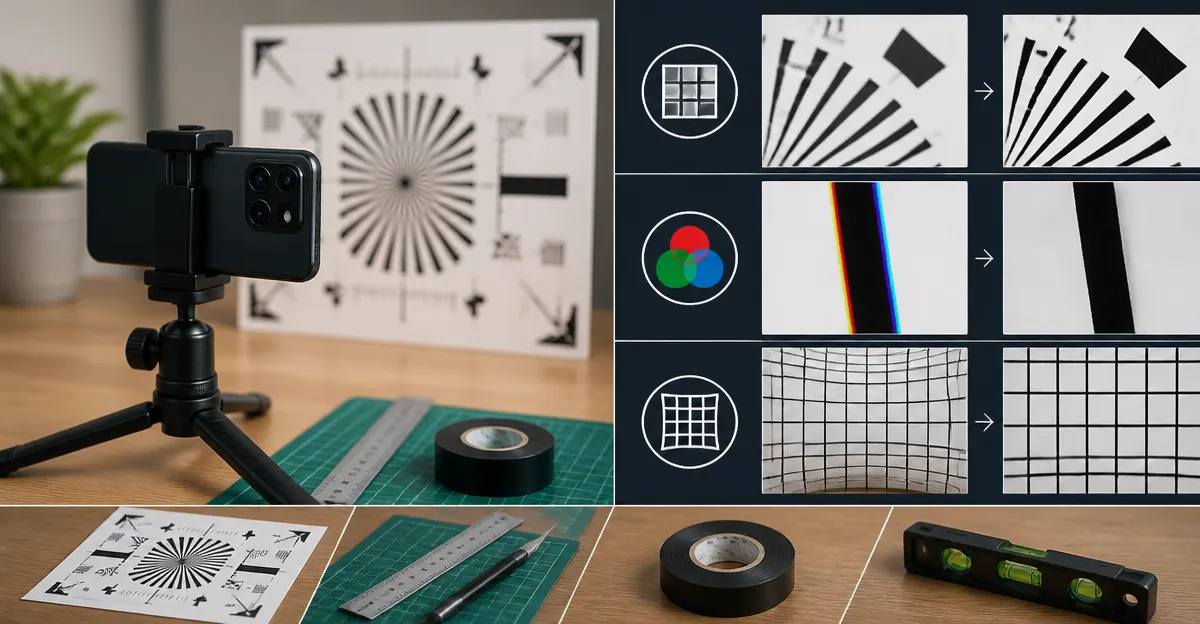
Introduction
One will learn how to evaluate smartphone camera lenses for sharpness, chromatic aberration (CA) and distortion using inexpensive tools. Understanding these optical characteristics enables one to diagnose lens defects, compare different devices and improve post‑processing workflows. The guide presents a systematic approach that can be performed at home without specialized laboratory equipment. By following the steps, readers will obtain quantitative data that supports informed purchasing decisions.
What You’ll Need
- Xenvo Pro Lens Kit – includes a 0.45× wide‑angle lens, 15× macro lens, clip and LED light.
- LiHUiee Progressive Lens Tester – tabletop device for measuring lens power and detecting aberrations.
- Blue Light Glasses Test Kit – simple strip for verifying blue‑light filtration, useful for confirming lens coating integrity.
- DGK High‑Res Lens Test Chart – three 8.5×11" charts for resolution, distortion and color calibration.
- DSLRKIT Focus Calibration Ruler – folding card for precise autofocus verification.
- Tripod, neutral background (e.g., gray poster board), computer with image‑analysis software (e.g., ImageJ) and a well‑lit indoor space.
Step 1: Set Up the Test Environment
One should begin by selecting a location that offers consistent, diffuse lighting. Position a neutral gray background at a distance of approximately one meter from the smartphone. Mount the phone on a sturdy tripod to eliminate hand‑shake, and ensure the sensor plane is perpendicular to the chart. The Xenvo Pro Lens Kit provides a clip that secures the device to the phone without obstructing the lens, and the built‑in LED light can be used to supplement ambient illumination when necessary.
It is advisable to set the camera to manual mode, disabling any software‑based sharpening or HDR processing. This ensures that the captured images reflect the optical performance of the lens alone. Record the exposure settings (ISO, shutter speed, aperture) for reproducibility.
Step 2: Capture Sharpness Test Images
Sharpness is assessed by photographing the resolution patterns on the DGK High‑Res Lens Test Chart. Place the chart so that the line‑pair section fills the frame horizontally. Use the macro attachment of the Xenvo Pro Lens Kit only if the chart is very close; otherwise the standard lens provides adequate coverage.
Take three exposures at the widest aperture (lowest f‑number) to maximize diffraction‑limited performance. Transfer the images to a computer and open them in ImageJ. Use the “Analyze → Plot Profile” function across a high‑frequency line‑pair region. The contrast between black and white bars should exceed 50 % for acceptable sharpness. Document the highest spatial frequency that meets this criterion; this value represents the effective resolution of the smartphone lens.
Step 3: Assess Chromatic Aberration (CA)
Chromatic aberration manifests as colored fringing around high‑contrast edges. To evaluate CA, photograph the black‑on‑white edge pattern on the same DGK chart. Ensure the lens is focused precisely on the edge, and capture the image without any post‑processing.
Open the image in ImageJ and split the channels (red, green, blue). Measure the lateral displacement of the edge between the red and blue channels using the “Measure” tool. A displacement greater than 1 pixel at the sensor resolution indicates noticeable CA. The Xenvo Pro Lens Kit wide‑angle lens can be employed to test CA across the field, as wide‑angle optics often exaggerate peripheral aberrations.
For lenses with anti‑reflective coatings, the Blue Light Glasses Test Kit can verify whether the coating also reduces blue‑light fringing. Place a test strip on the chart and illuminate it; a purple hue indicates transmission of blue light, which may correlate with increased CA.
Step 4: Measure Distortion
Distortion is quantified by comparing the geometry of a known grid to the captured image. Use the grid side of the DGK High‑Res Lens Test Chart. Photograph the grid with the smartphone held level and the lens set to its default focal length.
Import the image into ImageJ and apply the “Straighten” tool if the camera was slightly tilted. Then use the “Measure → Set Scale” function to calibrate the pixel size based on the known spacing of the grid lines. Select a series of points along a straight line that should be linear; the software will report the deviation from a perfect line. Barrel distortion appears as outward bulging, while pincushion distortion appears as inward pinching. Record the maximum percentage deviation; values under 2 % are generally acceptable for consumer smartphones.
The LiHUiee Progressive Lens Tester can be repurposed to verify the focal plane uniformity across the sensor. By placing the tester’s calibrated lens in front of the smartphone camera, one can detect subtle curvature that contributes to distortion.
Tips & Pro Tips
- Always use the same lighting conditions for each test to ensure comparability.
- When evaluating sharpness, avoid digital zoom; instead, move the camera closer to the chart.
- For precise autofocus calibration, employ the DSLRKIT Focus Calibration Ruler. Align the QR‑code on the ruler with the camera’s autofocus point and verify that the central “0” mark is the sharpest.
- Document all settings in a spreadsheet; this creates a reference database for future device comparisons.
- If the smartphone offers a “raw” capture mode, use it to bypass in‑camera processing that could mask optical flaws.
Troubleshooting
Problem: Images appear blurry despite a steady tripod.
Solution: Verify that the autofocus is locked on the intended target; use manual focus if available. Check that the DSLRKIT Focus Calibration Ruler is perfectly level, as a tilted ruler introduces focus errors.
Problem: Chromatic fringing persists after adjusting focus.
Solution: Capture the image at a smaller aperture (higher f‑number) to reduce lens‑induced CA, recognizing that diffraction may slightly lower overall sharpness.
Problem: Distortion measurements are inconsistent.
Solution: Ensure the camera sensor plane is parallel to the chart; use a bubble level on the tripod and re‑capture the image.
Conclusion
One now possesses a repeatable workflow for measuring smartphone lens sharpness, chromatic aberration and distortion. By employing the recommended tools—such as the Xenvo Pro Lens Kit, LiHUiee Progressive Lens Tester, Blue Light Glasses Test Kit, DGK High‑Res Lens Test Chart and DSLRKIT Focus Calibration Ruler, one can obtain quantitative data that supports device selection, firmware updates and post‑processing adjustments. The methodology is adaptable to future smartphone models, ensuring that one remains equipped to evaluate optical performance as technology evolves.
Products Mentioned in This Guide
Frequently Asked Questions
What inexpensive tools can I use to test smartphone camera sharpness, chromatic aberration, and distortion?
You can use a Xenvo Pro Lens Kit, a LiHUiee Progressive Lens Tester, and a Blue Light Glasses Test Kit for quick at‑home optical assessments.
How does the LiHUiee Progressive Lens Tester help identify lens defects?
It measures lens power and detects aberrations like chromatic aberration and distortion without needing lab equipment.
Can I evaluate lens coating integrity with the Blue Light Glasses Test Kit?
Yes, the kit’s blue‑light strip verifies filtration performance, indicating whether the lens coating is still effective.
Why is measuring chromatic aberration important for smartphone photography?
Chromatic aberration reduces image clarity and color accuracy, so identifying it helps improve post‑processing and device selection.
Is it necessary to have a macro lens for these DIY optical tests?
A macro lens like the 15× option in the Xenvo kit provides close‑up detail, making it easier to assess sharpness and distortion accurately.